


Chapter 5: The Sands of Agon
All manner of insects and desert-dwellers inhabit this dry land.
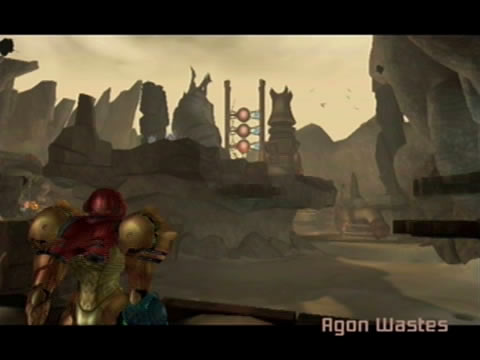
Beyond here you'll reach the Mining Plaza - the first open area of Agon. The entire area is dry and desert-like, reminiscent of the Chozo Ruins back on Tallon IV. The door the camera pans over to is your primary goal for now. Drop into the sand pit ahead to be greeted by a large worm-like creature. Scan the Sandigger before engaging it. Lock-on and fire at the eyes on either end of the creature, both need to be taken out before it yields.
With the sand pit clear head on to the rocky ledge ahead. Blow open the red blast-shielded door to discover a Save Station at the head of a long sand river. Scan one of the Sandbats from the swarm as they emerge from the river if you missed out back in the Great Temple. Save your game now before returning to the Mining Plaza.
As you exit the Save Station you'll see a second open sand pit in the Mining Plaza. Your exit is directly above, but you'll need to use the protrusions along the wall around the sand pit to reach it. Enter the pit and deal with the Sandigger before moving on. At the far end of the pit you'll spot another translator gate off to the left with an amber hologram - you can't breach this one yet so climb up around the platforms along the side of the sand pit. Up above you'll find a tall rock pillar beside a gaping gap overlooking the sand pit below. Scan the small weakened section at the base of the pillar before unloading a missile into it.
The pillar will smoothly collapse forward, creating the perfect bridge. Cross over while watching out for circling Sandbats. Once on the other side follow the path to a second tall rock pillar (don't worry about the amber Luminoth Lore Projector nearby. Fire a missile at the base of the pillar to bridge the gap.
Move forward to discover a door barred by a metal gate. Turn around and hop over the gaps towards the three bearerpods. From here jump across towards the tall structure adorned with three large focusing lens. Scan the lens and the statue of the large slug-like beast nearby (take note of its shape, you'll be seeing the real thing soon enough). Cross the bridge beyond while watching out for Sandbats - your exit is on the far side.

Samus recovers her trusty Morph Ball Bomb ability.
Sneak through the access tunnel you find via the Morph Ball, inside you'll find an Orb Cannon blocked by a simple stone block, but without bombs you can't do much with it. Exit the room ahead to reach Mining Station A. Listen carefully to the music as you enter - doesn't it sound familiar?? Step inside to receive your first warm Space Pirate welcome - three Pirate Troopers teleport in to engage their favourite enemy.
Scan one for your Logbook before engaging. Keep your distance and dance around to avoid their fire. Take all three out to secure the area. When the noise stops take a moment to scan around the area, you'll find a bunch of Space Pirate crates in the center (bust them open for health and ammo) and a visible translator gate up on the next level above the sandfalls (it's an amber hologram again so no luck there).
Look for a low platform between two sandfalls and ascend the area from there. Bypass the first door you find for now, we'll head through there later. Look ahead from here and scan the small creature roaming about - this Brizgee is impervious to your shots until you fire a single missile to break its outer shell. Jump over to the platform it scurries around on and launch yourself over to the first tall pillar in the center of the area. Cross to the next platform via the other pillars and make your way around the sandfalls.
Once you reach the largest sandfall possessing the large Luminoth statue before a gate, feel free to scan them both before moving on. Before jumping over the sand river, target the tall rock pillar ahead and use a single missile to bridge the gap ahead (the blast will probably hit the Brizgee too). Cross the gap and shoot open the red blast shield on the door ahead with a single missile.
Enter the next tunnel and take it slowly, ahead you'll find a pack of Shriekbat roosting on the ceiling. Scan one before taking them out from afar - get too close and they'll dive bomb you without delay. Beyond this tunnel you'll locate the vast Agon Temple (remember when U-Mos said there were temples like these in every area of the planet?). The two paths leading around the edge of the circular room are blocked, so you'll have to plow straight through.
This Luminoth guardian watches over the Energy Controller.
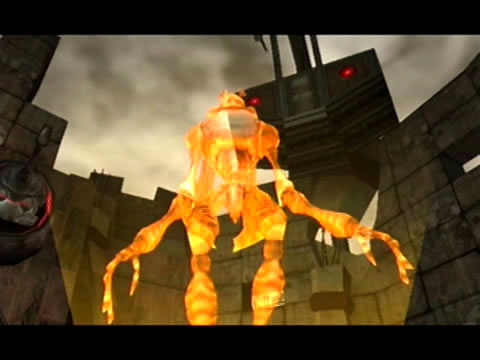
Drop down into the sand pit and head forward - naturally two gates will appear, blocking your only escape. A massive Sandigger then promptly emerges from below to face you. Scan the slimy thing to reveal it as an Alpha Sandigger, pack leader of all the lower forms. Only a few seconds into the battle an Ing Darkling appears above and infects the Sandigger - you're now looking at a very angry Bomb Guardian. It possess an energy bar, so head on over to the bosses guide for tips to finish off the beast.
With the Bomb Guardian dead you'll finally recover your long lost Morph Ball Bomb. Break out of the sand pit by laying a single bomb beside the two Talloric Alloy-laced gates. Head up to the door directly opposite where you entered the temple and head through. Inside you'll locate a large circular chamber housing a tall Luminoth device in the center. Scan it to reveal it as the Temple Security Station. Enter the Bomb Slot attached to it and lay a single bomb to gain access beyond.
The wall housing of the room will slide around, revealing the exit ahead. Scan the statue above the door for more Luminoth warrior history before entering. Inside you'll locate the Agon Energy Controller - a device much like the one U-Mos was guarding back in the Great Temple, except this one is devoid of any energy.
See that small interface in front of the controller? Samus' arm cannon perfectly fits in there, so you'll be using that once you've recovered the planetary energy from Dark Aether. Walk around the controller to find a lifeless Luminoth warrior lying beside a gold object at the rear of the chamber. Scan it to summon a hologram of the Luminoth warrior (I-Sha) recorded before their death.
Listen closely to what I-Sha says, they'll reveal that there's a portal nearby allowing access to Dark Aether. From there you'll need to locate three Dark Temple Keys to unlock Dark Aether's version of the Agon Temple to reclaim Aether's planetary energy.
Chapters:
- Planetfall
- The World Divided
- Fate of the Federation Troopers
- The Plight of the Luminoth
- The Sands of Agon
- Dark Aether
- The Space Pirate's Lair
- Samus vs Dark Samus
- Unlocking the Dark Agon Temple
- Restoring the Energy Controller
- The Journey to Torvus
- The Everlasting Deluge
- Restoring the Flooded Temple
- Taking the Fight to the Ing
- Expanding Samus' Arsenal
- The Underwater Temple
- Securing the Dark Torvus Temple
- The Path to Sanctuary
- The Mechanical Marvels of Aether
- The Sub Guardian Nightmare
- Subterranean Conquest
- Searching the Fortress
- Retrieving the Charge Combos
- Following the Echoes
- The Screw Attack Returns
- The King of all Mechanoids
- Gearing up for the Finale
- Unlocking the Sky Temple
- The Final Treasure Hunt
- Ending the War