


Data
Guides and strategies
- Power-up locations
- Shinespark Guide
- Bosses Guide
- Obstacles Guide
- Walkthrough
- Game endings
- Secrets and tips
- Game maps
Media
Chapter 9: Didn't See That One Coming
Major spoiler time. Please DO NOT read on if you haven't played up to this part of the game yet, as something's about to happen that you'd be best not to know about until playing the game. I mean it. Really.
LAST SPOILER WARNING!!
Upon finally escaping from the doomed Pirate fortress on Zebes, you'll watch a cutscene showing Samus taking off into orbit as the ground facilities blow to oblivion. Taking a well-deserved break, the game shows you Samus removing her suit and revealing the lovely lady within. But now's not the time for celebration, as Samus finds herself suddenly surrounded by weird Space Pirate scout ships.
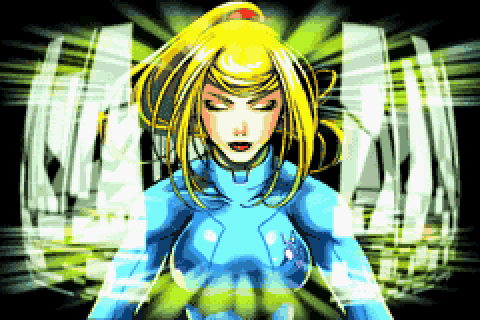
Samus relaxes aboard her ship... a big mistake on her part.
They give chase, madly firing away trying to shoot Samus down. It appears that Samus escapes her pursuers, but her ship then takes a direct critical hit from an unknown assailant. Out of options, Samus takes the ship down and crashes below on Zebes' surface, sacrificing her ship and Power Suit at the same time. You'll then see a short narrative of Samus pondering the current situation, while surveying the giant purple Space Pirate Mothership Ridley landed earlier resting nearby.
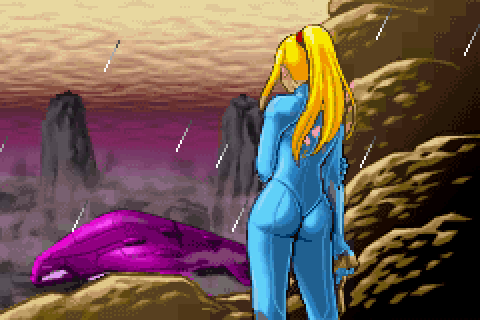
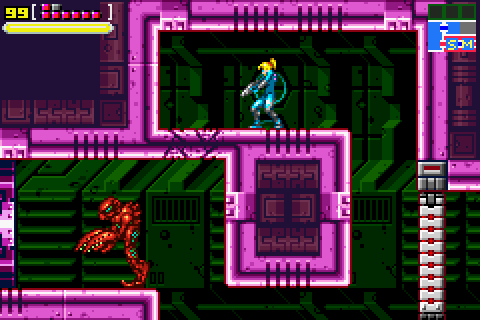
Once the game returns control to you, you'll find Samus completely without her Power Suit, only wearing a blue body glove which thankfully retains all your collected Energy Tanks. And what does she have to defend herself with? A measly little emergency pistol. Things aren't looking good. With this meager equipment you'll have to infiltrate and surreptitiously move through the Space Pirate Mothership, trying to find any possible way to escape.
You'll find yourself in an open rocky area with rain pouring down, and the game calls this area Chozodia. Didn't I say this was more than a remake? Now you know why. Take the armourless Samus over to the left side of this rocky area and proceed on. Before going any further, learn how the pistol works. Normal shots are useless against enemies, but if you stop firing and wait for the red bar below your Energy Tanks to fill up, firing the pistol unleashes a stronger shot capable of stunning enemies.
Alone, outnumbered and outgunned.
Climb up the following area (yep, somehow the Power Grip ability still works) and proceed left to locate the underside of the purple Mothership. Crawl under the ship (Samus automatically crawls through narrow spaces) and proceed left again. You'll see a bunch of red Space Pirates (aka Zebesians) running throughout the interior of the ship, but thankfully they can't see you from there. At the left end of this area you'll find a green door which you obviously can't penetrate, instead go down to the bottom corner below the door and shoot through a the grating there to uncover a narrow tunnel. Crawl inside to enter the ship.
Another short cutscene plays, where you see the close-up of a green mechanical eye opening. What could that be? Proceed through the first narrow tunnel without worrying about the Zebesians in the above corridor. Beyond here you'll find yourself in the Map Room, so download the map to find that the Mothership is a huge twisting maze of rooms. Go left once you've got the map to find a Save Room. Notice that the pod looks different to the other ones in Zebes? Jump on to find out why.
These ones not only save your game but also restore energy and ammo fully, health is something you definitely need right now. As the left door is red, you'll need to exit the room via the small tunnel above it. Once in the following large room, you'll spot a Zebesian guarding the door below. Now the Splinter Cell aspect of the game comes to light. You really don't want Zebesians to spot you otherwise they'll trigger an alarm, summoning reinforcements.
And you can't destroy them, all the pistol can do is stun them for a few seconds with a charged shot. The frantic nature of the music doesn't help either. Unfortunately you can't avoid being spotted by this first Zebesian guard. The best you can do is jump down through the hole ahead and quickly stun it before it moves. As soon as the alarm goes off shutters ahead will slam down, trying to trap you. Walk over to the shutter and an opening up the ceiling will appear.
Sneak aboard the massive Space Pirate vessel.
Jump up and crawl through the narrow tunnel. Be warned though, as the Zebesians can also crawl through narrow spaces. Jump up the platforms above and stun a second Zebesian above. Quickly head right and run into the following room. Crawl through the narrow tunnel and jump up into the concealed alcove above near the shutter. A Zebesian will walk into the room and stop, before turning and leaving. The alarms will go off, so you're safe... for now.
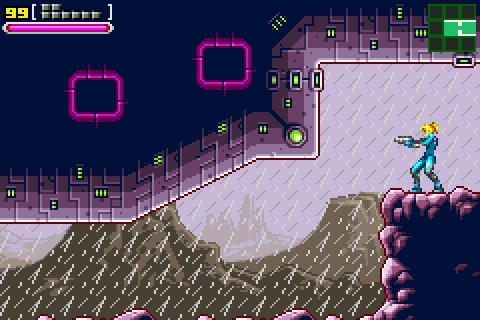
By the way, try to avoid taking damage from the Zebesians, they hurt a lot, especially on Hard. In fact you can only take three hits before dying on Hard, so this will definitely be the toughest part of the game. Proceed beyond the shutter when it opens and cross the hallway to find a giant room filled with what appear to be green alarm trip wires. Touch one of these green wires and the alarm goes off, so get used to dodging them.
Proceed right and crawl through the narrow tunnel you find. You'll find it leads nowhere, but this entire section is covered in Bomb Blocks. Samus' pistol can shoot through them, but as soon as you shoot hold Right as the ground beneath her will break apart. You'll crash land down into a trip wire and set off the alarm, instantly jump up to the now-exposed door in the top right corner. Run through the next corridor and clamber up the shaft further in.
Shoot out the small block covering the narrow tunnel leading to the next door and rush through. You'll find yourself in a tall shaft with a shutter blocking your path, walk up to it to fall through the ground. Stun the Zebesian at the base of the shaft, then frantically climb up to escape from it. The creature will try to climb up the wall and catch up, stun it again if it gets too close. Zip through the door at the apex of the shaft and immediately jump over the tall edifice in the following room.
Keep well out of sight.
Another shutter blocks your path, but if you stay still and don't move, a Zebesian will run into the room. Stay still and the stupid creature will leave the room, causing the alarm to turn off. The shutter will open, so head on through. Jump up through the opening in the ceiling ahead to find yourself below the hangar bay, where a squadron of scout ships rest idly - yep, that's your ticket outta here.
Crawl through the narrow tunnel beneath the floor to find yourself in another tall oddly-shaped shaft (keep an eye on your position on the map). Drop through crumbling blocks in the floor to enter the shaft, then go through the door behind you to find a Save Room (but annoyingly you can't get in there on Hard mode!). With your game saved and health restored (unless you're on Hard mode), climb up the shaft as high as you can and go over to the door down on the left side, opposite the door to the Save Room.
In the following shaft your path is blocked by a red door, so you'll need to shoot through the crumbling blocks near the right door to proceed. Watch out down below as there's a Zebesian waiting in ambush on the left, quickly stun him and crawl through the tunnel on the right. Shoot your way down through the next shaft by blowing away the crumbled-looking blocks. Once near the bottom of the shaft watch out for Zebesians below, then head for the door in the bottom left corner.
You'll enter the next chamber to be greeted by a tiny dead-end, but quickly run forward to drop through crumbling blocks up against the wall just as the Zebesian enters the room behind you. You'll fall further down into a small alcove blocked off by a shutter, somewhat like a prison. But of course the stupid Pirates think you've disappeared again and will lower the security level, opening up the shutter. Once free of your tiny prison, go left to find yourself at the base of a tall shaft inhabited by wandering searchlights. You can guess what they're for, touch one and Zebesians will come running.
The Pirates will no doubt eventually catch you... hide from sight to lose them.
Ascend the shaft very carefully, watching the patrol paths of the lights closely. At the very top go right to re-enter a shaft you visited earlier. Press on up the shaft and head left through the door above. Break through the Bomb Block walls in the following room to discover a Save Room beyond - you'll even be allowed access to this one on Hard mode. Go left after saving to discover a huge room filled with an assortment of laser trip wires.
Spin Jump up the wall ahead and climb onto the top of it. Jump down on top of the laser trip wire's block ahead, then jump across to the next purple platform. Jump over onto the flat floating platform ahead but watch out as it'll begin to crumble when you step on it. Try to jump over to the top of the next vertical laser trip wire, but don't worry if you trigger it. Quickly zip over to the door on the left and go inside.
Proceed through the next small chamber to discover a shaft leading down. If you're not being pursued by Zebesians at this point, then instead of crawling through the tunnel below to find a tall shaft filled with Zebesians, I suggest that you take a quicker route. Spin Jump up the left wall of this shaft to discover a hidden opening up in the corner. Drop down the hidden tunnel and descend the shaft.
As you fall through the shaft you'll see the rain pouring down from outside, before dropping down snugly into a glass tube corridor - totally bypassing the Zebesian-filled shaft behind the door there. Cross the glass tunnel and go through the next small chamber to find your surroundings drastically change.
Chapters:
- Ridley's Magma Pit
- The Mechanical Madness
- Didn't See That One Coming
- Childhood Memories
- The Hunt Isn't Over
- Final Run