


Data
Guides and strategies
Media
Bosses Guide

Each Core X you'll face in the game has infested and mimicked a different monstrous creature kept on the station - all of them are hostile. As you battle Core Xs they'll use a certain ability stolen from Samus against you, so subsequently when you defeat them you'll recover one of Samus' lost abilities.
Most Core Xs will change their form to a giant X parasite with a spiked shell once their mimicked form is dead, finish them off then absorb the free-floating parasite once the shell falls off to ultimately defeat it.
Some of the Core Xs will be using one of Samus' Beam Weapon abilities, these creatures are slightly different from the normal ones. There's not much to say about them except to fire at them when they open up and quickly jump out of the way when they fire a projectile. If you ever need health or missile refills during a battle against a Core X, shoot it with your Beam Weapon and it'll release smaller X parasites - plenty of ammo. Below you'll find handy tips on defeating each of the abominations.
Arachnus X

- Location:
Main Deck - Attacks:
Rolling charge, Fire wave, Sonic boom - Weakness:
Missiles - Recovered Ability:
Morph Ball
This huge armadillo-like creature will stomp around the room unleashing several attacks against you. If it rolls up into a ball get ready to jump over it when it charges towards a wall, also remember to use the small holes on the walls to grab hold and avoid Arachnus' attacks. When it strikes a wall and stands up, it'll often slash out before unleashing another attack. The attack could either be in the form of large blue sonic boom projectiles, simply jump over these to avoid them.
If a fireball comes out of its mouth and strikes the ground it'll create a fire wave across the floor, leap up and grab hold of one of the holes on the walls to stay airborne while the fire's lit. Pummel Arachnus' front with missiles to damage it. If you run out of missiles just lay into it with your Beam Weapon.
With enough damage it'll revert back into the large spiky-shelled Core X, grab the free-floating Xs that appear and pummel the shell with missiles. Once the shell breaks off quickly absorb the exposed X to recover the Morph Ball!
Zazabi X
- Location:
Sector 2 (TRO) - Attacks:
Jump trap, Stomp attack - Weakness:
Missiles - Recovered Ability:
Hi-Jump/Jumpball
This tall weird-looking creature will hop around the room trying to squash Samus under its base. It doesn't have much more to use offensively, just make sure you don't get caught and keep moving around. If the creature jumps up high into the air and opens its base wide, it'll slowly fall back down to try and trap Samus inside its body where it'll inflict major damage. Here's your only chance to give some back. Quickly stand under the creature as it drops and fire a missile (two if you're feeling lucky) up into its body to inflict damage.
Quickly run out of the way before it lands so you don't get caught. With enough strikes, parts of the creature's body will blow off and it'll become shorter. Eventually you'll blow off all three parts so only the head with the eyeball remains, finish off this part and the creature will revert to the shell-encased X form.
Finish it off with more missiles (grab all the X it releases) and absorb the X to recover both the Hi-Jump Boots and Jumpball (Spring Ball) abilities together!
Serris X

- Location:
Sector 4 (AQA) - Attacks:
Speed boost charge - Weakness:
Missiles - Recovered Ability:
Speed Booster
To get the giant water serpent to appear, jump up to the platforms above the water. This massive creature will be shooting around the room at top speed most of the time so you'll need to be quick to avoid suffering damage. While Serris is glowing it'll move around quickly, wait for it to stop before attacking. The creature will swim around the room in different patterns, you can either stay above or below the water while waiting to strike, just be careful underwater as you won't be able to move around smoothly.
Staying underwater allows you to see where Serris will come up out of the ground, when you see bubbles coming up quickly fire a missile at Serris' head just as it emerges to inflict damage. Watch out whenever you score a hit as the serpent will charge up and swim around the room at blinding speeds again. Landing successful hits on the face when you're up on the platforms can be hard work, try staying underwater to hit the face just as the creature emerges from the ground.
With enough of a pounding the tail will explode and the head will return to the spiky-shelled Core X form. Finish off the monster above the water to recover the Speed Booster!
Security Robot B.O.X.
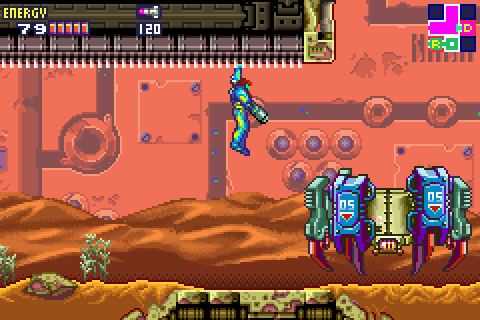
- Location:
Sector 3 (PYR) - Attacks:
Fire bomb, Charge attack - Weakness:
Super Missiles - Recovered Ability:
N/A
This robot hasn't been infected by any X parasites so it's only attacking you because it thinks that Samus has entered a restricted area. Samus has every right to be here in the station, so we'll show this machine who's boss. Begin by jumping up to the ladder on the ceiling to avoid being run over by the robot as it dashes back and forth. If the robot pounds the ground with its legs on the spot it'll lower down and launch a bomb into the air.
Once the bomb lands on the ground it'll create two fire walls that move outwards from the impact zone. Quickly move so that you're directly above the bomb as it goes off so you won't be hit by the fire barriers. The fire barriers will rise and fall as they move along, if you can't make it above the bomb when it blows wait for one of the barriers to lower then quickly pass over it to avoid taking damage. The robot will continually hop about while laying bombs, you'll need to fire missiles straight down into the center part of the robot to inflict damage. You won't be able to inflict damage when it launches a bomb, so try to pull off successful hits while it's moving around. You should be able to pull off some accurate diagonal shots, if the robot gives you too much trouble just try to hit it from directly above.
After punishing the robot with enough missiles you'll start to see the covering around its core beginning to wear away. Keep the pounding up and you'll take it down in no time.
Barrier Core X
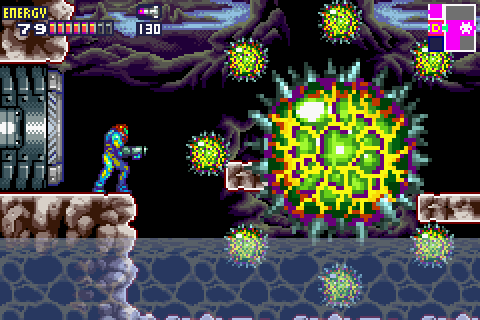
- Location:
Sector 6 (NOC) - Attacks:
Mini-core Xs, Rush attacks - Weakness:
Charge Beam - Recovered Ability:
Varia Suit
This creature is relatively easy to beat when you know what to do. The only weapon that can harm this thing is the Charge Beam, so use it well. The giant Core X has several smaller versions of itself floating around as protection, the Charge Beam will shred through them easily. Watch out for the giant creature's flying patterns as it'll often try to fly into Samus. Keep out of the water and fire away with the Charge Beam, in no time you'll revert it back to the spiky-shelled Core X form. Finish off the beast to recover the awesome Varia Suit!
Gedo X
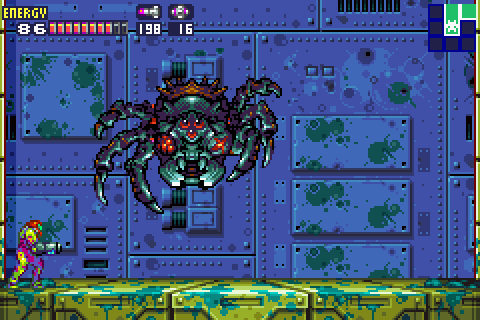
- Location:
Main Deck (Reactor Silo) - Attacks:
Stinger attack, Fireballs - Weakness:
Super Missiles - Recovered Ability:
Space Jump
This giant spider will be bouncing around the room trying to grab hold of Samus. Whatever you do, make sure this thing doesn't grab you as it'll pull Samus up and inflict major damage. A good trick is to activate the Morph Ball and stay near the corners of the room, most of the time the spider will bounce off the walls and miss you in a corner. Before the spider first appears it'll shoot down three fireballs, stay away from them until they die down and disappear.
If you feel like taking a risk, stand in the center of the room before the boss appears. When you hear the racket above of the spider about to expel fireballs, launch a number of missiles directly above. You won't see anything happen but the missiles should strike the boss in its open mouth, giving you a pre-battle advantage! Run away quickly to avoid the raining fire.
The spider will shoot down fireballs often, just be wary of them and stay away. When the spider stops moving to shoot fireballs it'll open its mouth wide. Quickly stand below and fire one or two missiles into its maw to inflict damage. Keep this up and you'll notice the spider will slowly turn a dark blue colour. With enough of a pounding the legs will fall off and the head will drunkenly fly about the room often spitting out lumps of garbage. Stand still and fire missiles up into its mouth when it drops garbage to keep inflicting damage, if your missiles hit the garbage they'll explode so you shouldn't take too many hits.
With enough pummeling the head will slowly turn red before exploding and reverting back to a spiky-shelled Core X, finish off the monster to recover the Space Jump!
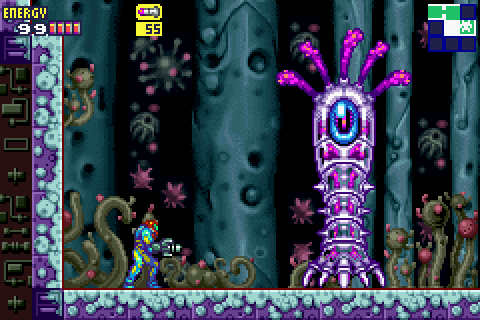
Plant Core X
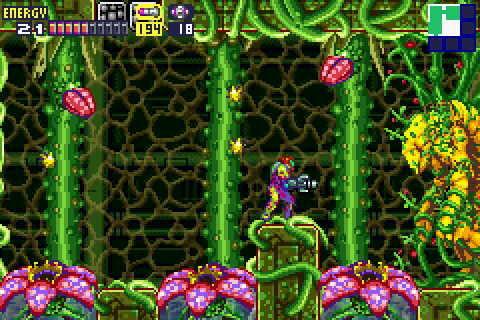
- Location:
Sector 2 (TRO) - Attacks:
Plant spores, Plant traps, Plasma projectiles - Weakness:
Super Missiles - Recovered Ability:
Plasma Beam
This giant creature (look closely, it almost looks like a Chozo Statue covered in vines) has a few offensive attacks throughout the room. You'll need to watch out for the spores that fly out of the two plants in the upper corners of the room, and try your best to stay on the platform away from the traps in the floor as if you fall into them they'll grab you and inflict damage. If you fall in try to jump straight out (hold A) instead of Space Jumping out of them. Stand on the platform and fill the large Chozo Statue with missiles to inflict damage.
Parts of the creature will break off as you continue to fire at it, either duck and use the Morph Ball to avoid contact with the ever-floating spores or fire at them as they draw close. Eventually the head will fall off and the two plants firing spores will explode. The creature will now expel bursts of Plasma Beam fire, but you shouldn't have any trouble ducking and jumping over them. The traps in the ground will also start spitting out spores but by staying on the platform you'll completely avoid them. Keep ripping into the creature with Super Missiles and it'll eventually explode completely to become the spiky-shelled Core X. This one will be using the Plasma Beam, so once the large creature blows jump over to the open area on the right and fire at the Core X when it opens up to fire.
Finish off the monster to completely clear out the vegetation growth and recover the Plasma Beam!
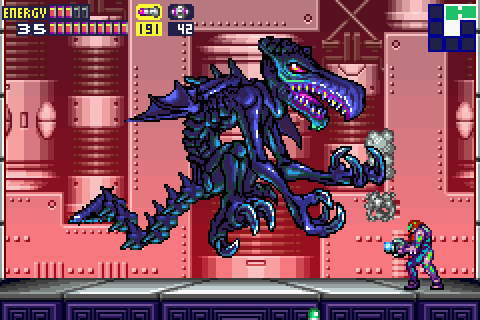
Nightmare X

- Location:
Sector 5 (ARC) - Attacks:
Multi-laser system, Gravity well, Charge attack - Weakness:
Super Missiles, Charge Beam - Recovered Ability:
Gravity Suit
Once you descend into Nighmare's room it'll slowly rise up from the ground. This odd-looking monster possesses two large arms with gun turrets lined up all along them, so you'll have to watch out for frequent energy blasts. As it hovers around rather drunkenly you'll spot a large round device between its arms, this is the device it uses to manipulate gravity and is its first weak point.
Jump up to lure the creature to fly up high then quickly run under it and fire missiles up into the device. With each hit the creature will let off a squeal that sounds much like a cat, keep pummeling the device and Nightmare will activate it. Once the gravitational pull kicks in you'll move around slower and your missiles won't fly up properly when you fire, so you'll need to stay under Nightmare and pummel the device until it blows.
Missiles will drop straight to the floor upon discharge, so either hit the device when it's right above Samus or use Charge Beam shots to strike it from afar (the Charge Beam blasts won't be affected by gravity - thanks Chase!). Don't worry about taking too much damage, it's hard to avoid the creature's attacks with such whacky gravity. Once the device explodes Nightmare's faceplate falls off revealing an ugly array of eyeballs in a green slimy face. You'll now need to pummel the face with missiles, but it'll be tricky.
Quickly jump up to the ladder on the left wall and fire across at the face each time Nightmare slowly moves towards you, but quickly Space Jump away when it begins hovering around the room trying to catch Samus. Each time it hovers down over on the right side of the room grab hold of the ladder and hopefully it'll stop and slowly hover towards you. Get ready to move quickly if it keeps flying around trying to slam into Samus.
As you pummel the face it'll slowly sag down and look even uglier, after sagging down twice and turning red keep firing to ultimately destroy the creature. Finish off the Core X that appears to recover the Gravity Suit!
Security Robot B.O.X. X

- Location:
Sector 6 (NOC) - Attacks:
Homing missiles, Electrified water - Weakness:
Super Missiles - Recovered Ability:
Wave Beam
As soon as you enter this long corridor partially filled with water after visiting the Restricted Zone, the robot will charge in from the right. The crazy state of the robot has caused the water to become electrified so don't ever touch it. Quickly lay a Power Bomb to blow open the ceiling, revealing a ladder running across. Grab hold and stay up here for most of the battle. The robot will dash about trying to jump up to slam into Samus, keep moving to avoid it.
If the robot stomps the ground and lowers down it'll launch a range of missiles that partially home in on Samus, quickly blast them with the Plasma Beam before they hit home. Just like last time you'll need to strike the center of the robot with missiles to inflict damage. Try to pull off diagonal shots as the jumping activity of the robot makes it hazardous to remain directly above. Nothing much more to say here, just make sure you fire at the missiles when they launch and stay away from the robot to avoid being knocked off the ladder.
With enough of a pounding the robot will explode and its organic components will revert back to the spiky-shelled Core X we're so used to by now - but this one will be the kind that opens up and fires projectiles. Drop down off the ladder and wait for it to open before firing, quickly jump out of the way when it returns fire. Finish off the monster to recover the handy Wave Beam.
Neo Ridley
- Location:
Sector 1 (SRX) - Attacks:
Fireballs, Grab attack, Tail lash - Weakness:
Charge Beam, Super Missiles - Recovered Ability:
Screw Attack
This shrieking form of Ridley isn't the real Ridley we're used to fighting so this won't be a grudge match. You'll need to watch out for this massive creature as it flies about the room as it'll constantly be trying to fly into Samus. You'll be treated to a remake of the classic boss theme from Super Metroid during this battle so it won't be too bad. Watch out for Ridley's large fireballs, his tail will also cause trouble often. It'll be difficult to avoid colliding with the monster, thankfully you won't lose too much health with each hit (especially with so many Energy Tanks).
If Ridley grabs you and flies upward just keep firing away with Super Missiles to pound the beast. After delivering enough damage Ridley will let out a hideous shriek and slowly change colour. Each time Ridley shrieks it'll become weaker, if you're playing the game on a Game Boy Player just don't have the volume up too high, the shrieking coming from this monster can become very annoying.
Charge Beam note:
Special thanks to Gustavo for pointing this one out. Try using fully-charged Charge Beam blasts against Ridley instead of missiles, as each hit tears through the target and inflicts heavier damage!
SA-X
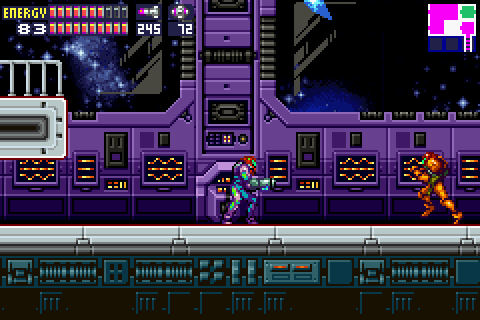
- Location:
Main Deck (Operations Deck) - Attacks:
Ice Beam, Screw Attack - Weakness:
Plasma Beam, Charge Beam - Recovered Ability:
N/A
Once the SA-X appears in the large Operations Deck room, descend to the floor and engage it there. This time you'll finally be able to inflict damage on the beast, but it'll be tricky to avoid taking hits from its Ice Beam. The SA-X will also be jumping about using the Screw Attack, try to stay away and use your own Screw Attack to avoid taking damage.
Only a charged blast from the Plasma Beam can harm this copycat. Try to use Ice Missiles to first freeze the SA-X like before, but as soon as you freeze it quickly charge up the Plasma Beam and rip into the SA-X before it unfreezes. Space Jump around the room and keep your weapon charged, take shots at your target as often as possible. Avoid its Ice Beam and keep freezing it to try and score safer hits. After about five or six successful Charge Beam shots the SA-X will kneel over in a weakened state.
The freak will then look up and change into a massive twisted monster. It'll jump around the room trying to stomp down on Samus, use the Charge Beam again to inflict further damage. After a few shots the monster will fall over and finally revert back to the spiky-shelled Core X. This one will continue to fire bursts of ice. Wait for it to open up before firing missiles and jump up quickly to avoid taking damage.
Once you finally deal the final blow the shell with fall off the Core X, but it'll be flickering and you won't be able to absorb it. The coward will then retreat and fly out of the room, leaving you to continue on to the Operations Room.
Omega Metroid
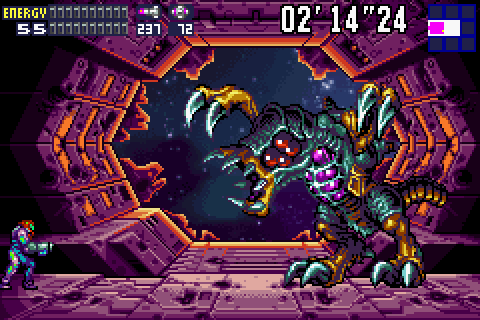
- Location:
Main Deck (Docking Bay) - Attacks:
Slash attack - Weakness:
Ice Beam - Recovered Ability:
N/A
You'll find the massive Omega Metroid where your ship is supposed to be docked. At first you won't be able to injure this huge creature with any weapon in your arsenal, even Ice Missiles won't have any effect. Instead, wait for the Omega Metroid to slash out and strike Samus deliberately, you'll then lose all your health except for 1 unit of energy. This scenario certainly brings back memories, doesn't it?
But this time it isn't a Metroid that saves Samus, instead amazingly it's the SA-X. The SA-X will jump into the room and begin attacking the Omega Metroid's chest with its Ice Beam before receiving a slash attack from the creature. The SA-X will fly back and revert back to the gelatinous free-floating X form, quickly leap up and grab the creature to absorb it. Upon absorbing the SA-X you'll finally smite it and regain the Ice Beam ability! You'll also regain all your health and Samus' Power Suit will change to an orange colour. Now it's down to you and the Omega Metroid, so let's finish it off, shall we?
With the Ice Beam you'll be able to inflict damage on the Omega Metroid by aiming up with L and firing away at its chest. It'll reel back with each hit but watch out as it can still slash out. If you're hit by its slash attack you'll fly back and be momentarily stunned, with the timer constantly ticking down you can't afford to waste time so quickly run back whenever the Omega Metroid raises its claw.
Continue to fire away at its chest while running back before it slashes, slowly the Omega Metroid will turn blue before turning a shade of red. Finish it off with several more blasts and the monster will finally explode, leaving you alone at last in the Docking Bay.
Your ship will then magically appear outside the wrecked hangar door and fly inside, quickly stand within the yellow portal that appears to be whisked away inside your ship. Taking off at full speed, you'll have finally escaped from the station! Congratulations, you've beaten the game!