


Data
Guides and strategies
Media
Chapter 1: Biologic Research Station
SR388 - former home of the Metroids.
Once you've started the game you'll witness the fateful intro where Samus is attacked by the X and subsequently recovers after being injected with the Metroid vaccine. After Samus' reflection in the prologue, the SC will inform Samus that the ship is approaching the B.S.L research station. Once the ship lands in the Docking Bay of the research station, the SC will give you your first objective.
Each time you enter a new area of the station, the SC will give you an almost-complete map of the entire area. The SC will inform you that an explosion has rocked the Quarantine Bay, this was where captured creatures from SR388 as well as the parts from Samus' Power Suit were sent, so something fishy's going on. After showing you were the target room is, you'll be asked if your objective's clear. Every time the SC asks you this, say Yes to continue, or No to hear the detailed objective again.
Once you're ready Samus will emerge from her snazzy new ship and be ready to rock and roll. Straight away you'll feel the similar control structure to SM, so we'll get going already - mastering the controls in this game is easy.
Head through the Docking Bay and go through the following corridor on the left. Next you'll reach a tall shaft leading up. Ascend to the top and go through the door there. Pass through the next corridor to reach another tall shaft leading up. Keep going through the door ahead to reach the first Navigation Room. Step on the pad in the center of these rooms to uplink to the SC to confirm your objective.
Once your objective's confirmed go left to find yet another tall shaft. The only difference with this area is the lighting and drastic music change, you'll be hearing a creepy theme playing so you won't be alone here for long. The door straight ahead is sealed shut, so climb up to the top of the shaft and go through the door there. The next room contains a large ruined roof section dangling down leaving only a small gap below it, this room also contains a large shaft leading down. Drop down the shaft and go left to reach the Quarantine Bay.

Samus now carries the legacy of the Metroids within her.
The crates and pods in this room certainly look damaged, go to the far end of the room to encounter a Hornoad, the same kind of creature that the X parasite attacker had mimicked on SR388. Waste the creature with a few well-aimed shots, another X parasite will emerge from the creature once it blows. This time is different though, when the parasite appears quickly touch it. Samus will absorb the X, killing the parasite and restore energy in her Power Suit. This is due to the Metroid cells now present in her DNA, Samus will never again be affected by the X. In fact, she can destroy any free-floating X by absorbing it.
The hunt is on. Press Start to bring up the map screen and press A to see a message informing you to return to a Navigation Room. Before leaving here, you'll notice the wrecked remains of a crate and pod in the background where the Hornoad was, something certainly did break out of these storage containers, soon you'll find out what it was.
Once you return to the Navigation Room the SC will give you more info on the X and how Samus can absorb any free-floating one to recharge energy and missiles. The SC will then inform you that it is detecting massive life readings over in a large room on the far right side of the area (it'll show you on the map) and that you should investigate. The SC will also unlock Level 0 security doors, so you'll now be able to open up the flashing doors.
Time to explore more of the station and confront more dangerous X- infested creatures. Leave the room via the right door and climb up the shaft. Go through the first door up on the right and watch out for the Hornoad in the following room. The next room contains a Save Station, save your game before proceeding. Climb up the shaft in the next room to find a large creature blocking a door. You won't be able to harm this thing without missiles, so keep ascending the shaft. In here you'll encounter Zombie Researchers, one shot takes them down so you shouldn't have any trouble with them.
Data rooms are a very welcome sight.
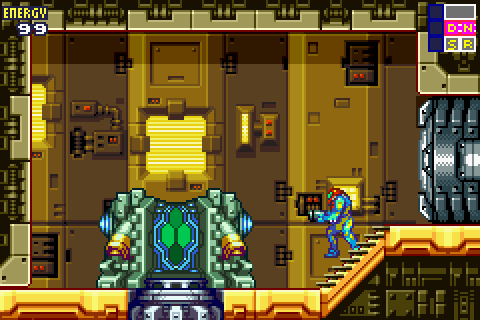
Watch out though as after several seconds another X will float into the room and restore the creature so don't hang around. Go through the door at the top of the shaft to reach another Navigation Room. In here the SC will inform you that the Federation is sending Missile data for you to download. The Data Room you'll need to reach for this upgrade is up in the Operations Deck. In the next room, climb up the shaft and through the door to find an elevator shaft. Ride up the elevator to the Operations Deck. During many of the elevator rides Samus will reflect on different areas, here she'll reflect on Adam Malkovich, her former CO when working for the Federation. Once at the Operations Deck, go through the door to reach a large open area.
Three doors adorn the wall on the left side, the lowest door leads to Recharge and Save Rooms, while the middle door leads to a Navigation Room and the Data Room where you'll find the Missile Launcher data waiting. Stand in the large capsule in the Data Room to receive the upgrade. You'll start with ten missiles, which can be fired by holding R then pressing B. Go back to the Navigation Room, when you enter the room part of the electrical systems will shut down and another creepy tune begins to play. The SC will tell you that electrical interference has disabled the elevators in this area, so you won't be able to use the same elevator you used to reach this area before.