Data
Guides and strategies
Media
Ridley Bosses Guide

The Subspace Emissary is one of Super Smash Bros. Brawl's grander features, and this adventure mode wouldn't be complete without several boss encounters. The bosses themselves comprise a number of unique characters alongside several foes of classic Nintendo mascots.
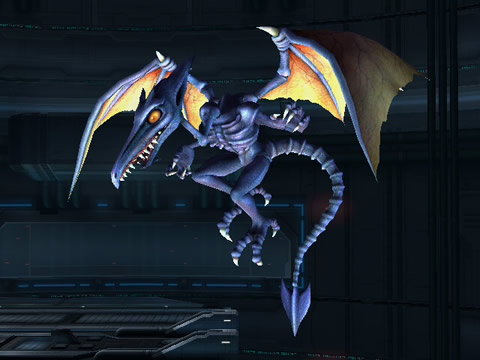
Samus Aran's arch-nemesis - the space dragon Ridley - makes an appearance awaiting players deep in the bowels of the Isle of Ancients. But why have one Ridley when you can have two? Meta Ridley also awaits players in a Subspace Bomb production facility. Both these forms of Ridley prove a tough final challenge to the equally difficult stages they feature in, so read on below for tips to survive the encounters.
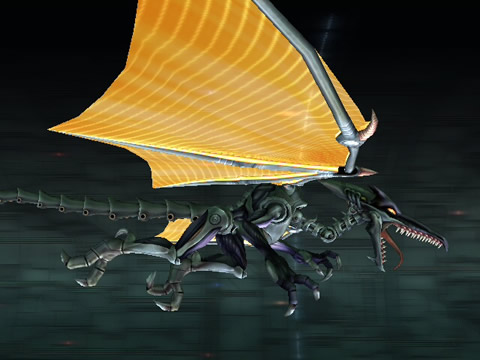
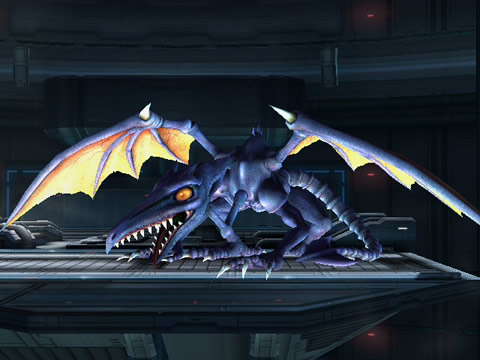
Ridley
- Location:
The Research Facility (Part 2)
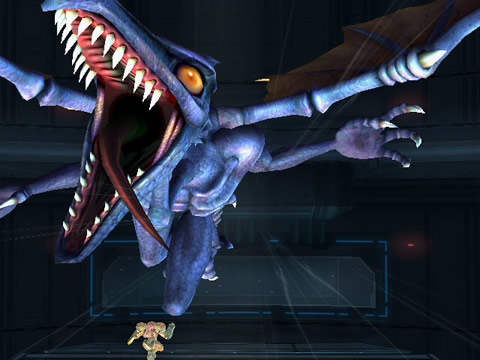
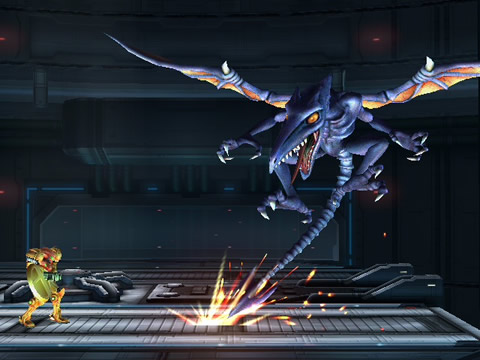
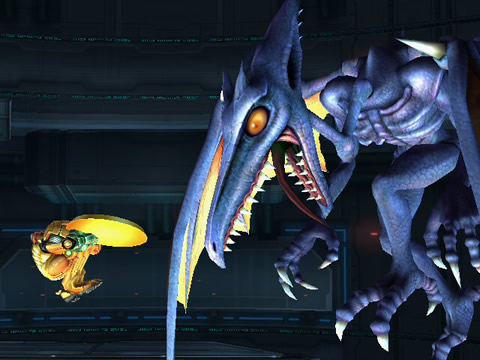
This classic purple form of Ridley awaits in the bowels of the Research Facility atop a long solid platform. He tends to hover about either edge of the sturdy arena so you'll need to utilise mostly aerial attacks against this target. Thankfully by this point Samus has restored her Power Suit and Pikachu's lightning attacks give you a healthy arsenal (especially his Thunder attack: Special attack + Down).
Ridley will deploy a range of attacks against you, normally taking a breather for a few seconds between each round. A toothy roar normally precedes an attack. If Ridley curiously coasts off the edge of the arena and disappears, don't let your guard down. Quickly leap up as high as you can (use a mid-air jump but not your character's Special attack + Up move) and hit guard just as Ridley reappears. He'll streak across the arena lightning fast in a collision-course attempt, but if you time it right and lure him up high you'll fall to the floor as he safely clears your character's head.
If Ridley stomps down hard on the ground before leaping straight up and out of sight, watch out for two possible maneuvers. If there's a pause, quickly run away from wherever you're standing. Seconds later Ridley crashes straight down exactly where you stood before. If instead you hear a whooshing sound and visible wind lines appear, Ridley cruises in from the backdrop attempting to slam into your position (like the trick Master Hand enjoys). Try leaping into the air again and guard mid-air just as Ridley passes through to avoid any harm.
Ridley may also try to summon up a typhoon with his wings, slowly pushing you off the edge of the main platform. Simply keep moving towards him to hold your footing. If he lunges forward and attaches his tail to the ground, quickly leap up and guard as he passes. The tail latched to the ground scrapes nastily along the deck - don't get caught to avoid a stream of damage.
Use any mid-air attack at your disposal, unfortunately Ridley's altitude makes using any Smash Attack difficult. Use any special items appearing randomly, and memorise Ridley's attack patterns to keep yourself safe. Rapid mid-air attacks (like Samus' Normal attack + Forward) also help chip away at Ridley's health.
Trophy tips:

Scoring the Ridley trophy is a challenge in itself. Like all bosses and stronger foes in the Subspace Emissary, you must first drain Ridley's health almost completely before striking him with a trophy stand. Actually scoring a trophy stand from the randomly appearing items can also be a chore, so increase the odds by using stickers on your characters that increase trophy stand drops (playing on higher difficulty settings also helps improve the odds).
Once a trophy stand does appear, keep in mind that you can't use normal attacks while holding one or your character will deploy the stand. The trophy stand will also eventually disappear if you don't pick it up, so be sure to snag it and drop it with Grab if you need to use normal attacks - ensure you drop the stand if your character has a high percentage to avoid losing it along with your fighter.
With Ridley's health almost gone it's time to take action. You'll find that leaping up and throwing the stand at Ridley as he hovers over the edge is usually a bad idea as the trophy will simply fall off the edge into the abyss. You can try to use a fast character (like Fox or Zero Suit Samus) to fall off the edge and grab the trophy as it falls, but this is quite risky. Instead, memorise Ridley's movements and wait for him to move across the arena with his tail scraping along the ground. Just as he moves forward to perform this attack, leap up and deploy the stand.
If your timing is right the stand will smack into his face as he passes over the platform, resulting in the trophy landing safe and sound. Be sure to quickly pick up the trophy before the stage ends!
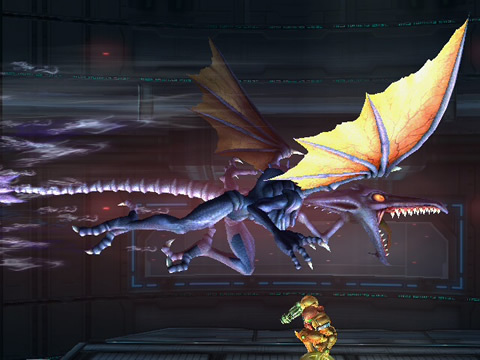
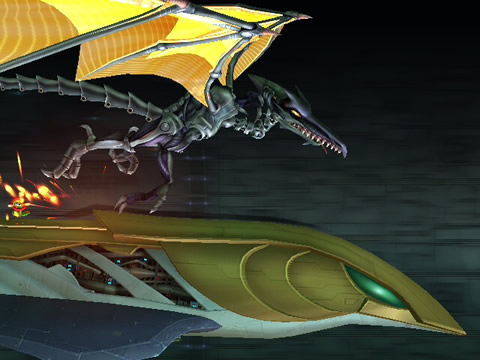
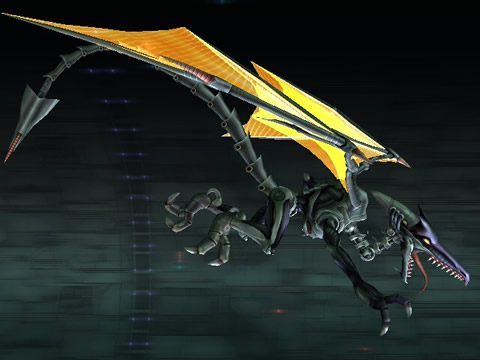
Meta Ridley
- Location:
The Subspace Bomb Factory (Part 2)
With the entire Subspace Bomb Factory seconds from destruction, Meta Ridley is the only standing between yourself and freedom. The good news? You'll have a number of fighters in your team to deal with him. The bad news? The battle takes place aboard the Falcon Flyer as it speeds away, and this platform surely won't be as steady as the arena where you fought Ridley. More bad news? You're running against the clock - when it reaches zero all those pretty Subspace Bombs back in the main chamber detonate all at once.
So this is going to be one tough battle to round out the gauntlet. Meta Ridley most often remains on the far left side of the screen, hovering just out of reach of the Falcon Flyer's engines. He'll batter the ship in all manner of speaking, so keeping your footing will be tough. If Meta Ridley slowly coasts across the top of the ship, leap up high and avoid his claws as they scrape along the fuselage. Watch out if he quickly disappears off the left side, in seconds he'll return and smack down hard on the engines of the ship, jerking it incredibly hard. Use a mid-air jump at the right moment to keep yourself in the air just as he strikes to avoid losing your footing.
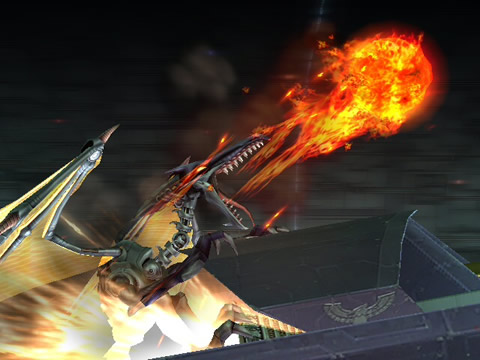
This time Meta Ridley won't hesitate to spew plasma from that giant maw, so watch out for two forms of plasma attack. He may remain in the air and send forth a barrage of plasma bolts all across the ship, try to guard roll between the impact zones or leap up out of range to avoid a direct hit. The second plasma attack won't be as kind. If Meta Ridley swoops down and clutches the engines, he'll begin dragging the entire craft down off the screen. Quickly retreat to the nose and wait there. Meta Ridley then sends forth a nice surprise - huge plasma balls of death. Touch one of those suckers and you'll be hard pressed to avoid an instant KO.
Not only will you need to time your jumps between each heated plasma ball, you'll also need to jump just at the right time when the ship is dragged completely out of sight. If you remain atop the ship as it disappears it's an instant KO. Meta Ridley may also rein a single plasma ball down on the ship while hovering in his regular position - watch for his mouth glowing as your cue to move clear. Finally, Meta Ridley may perform a variety of quick swiping dives, simply guard at the right moment to avoid damage.
Just like the first Ridley, this target will remain airborne most of the time so aerial attacks won't let you down. Due to the bouncing nature of the ship as Meta Ridley strikes it, try to score Smash Attacks if he hovers close to the surface. Always keep your distance if Meta Ridley grips the engines and spews forth his massive plasma balls, otherwise keep close and don't let up to avoid running out of time.
Thankfully, if you do run out of time, simply select continue to begin the battle anew - you won't need to traipse through any part of the tedious stage again. You may also notice that as Meta Ridley's health drains (especially on higher difficulty settings), he tends to hover further back toward the left side of the screen to give you a harder target to strike. Memorise Meta Ridley's attack patterns and don't waste time unloading aerial attacks to secure your escape.
Trophy tips:
Once again you'll need to nail Meta Ridley in the air with a trophy stand to score the Meta Ridley trophy, but that annoying time limit and his airborne position won't make it any easier. Once a trophy stand does appear, either pick it up and drop it periodically with Grab to give yourself time to attack Meta Ridley normally, or pick it up and drag his health right down with special attacks to avoid throwing it by accident.
Like before, Meta Ridley tends to always hover above the chasm below, so don't deploy the trophy stand against him unless you want to risk leaping off the edge of the ship to grab the trophy before it falls away. Otherwise, keep a firm grip on the stand and wait for Meta Ridley to coast over the top of the ship. Stand beneath him and quickly send the trophy up into his underside as he passes overhead. Score a hit and watch as the trophy falls right into your fighter's hands.