


Data
Guides and strategies
Media
Bosses Guide

Four tables boast the toughest opposition you'll face in the game. The main objective of these tables is to overcome the featured boss character without losing your payload of lives.
In Multi-mission mode, defeating a boss will reward you with a single artifact; conquering them in a Single mission completes the round and records your high score (in this case, the time you took to defeat the boss). You'll only be given a single life in a Single mission, so don't expect an easy ride. Also note that sometimes extra artifacts will appear during the boss rounds (in Multi-mission mode) so be sure to grab them before defeating the boss.
Read on for tips to exploit against each boss and ways to avoid defeat.
Thardus
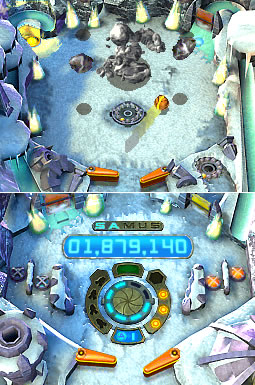
- Location:
Phendrana Drifts - Attacks:
Triclops, Rock projectiles, Rolling thunder
Thardus lives in the top half of this table, so naturally keeping your ball up there is key - with two flippers per half you shouldn't have much trouble. In Multi-mission you'll secure the Power Bomb before awakening Thardus, in either case be sure to set one off on the top screen to shred a healthy chunk of his health (but don't set it off if he's rolling about the arena).
Thardus won't move while standing, instead the beast tends to summon rocks of varying size to fling at you from anywhere on the table. Best way to avoid them is to keep moving the ball around and don't be afraid of returning to the bottom half.
Which brings us to the annoying pair of Triclops inhabiting the bottom half. More often than not these pests will lose you lives more than Thardus himself, just rub the touch screen madly if they snag you and keep dropping bombs to hopefully catch them off guard.
See the array of ice stalagmites scattered around the table? One of them is randomly flashing. Destroying that one rewards you with a force field, so be sure to keep an eye out for it. Also try to launch the ball into the Scan pod up in the top left corner - be happy with either a health recharge or force field bonus.
After sending a volley of rocks your way, Thardus will enter ball form and roll around the upper screen. Either launch the ball up the top-right corner to return below or hide in the Scan pod to avoid the torrent as you can't deliver damage at the moment. Rub the touch screen if you're caught as the monster can easily sap your health here.
Once Thardus stands up use the two upper flippers to quickly send the ball into him, or if you find yourself down below try to launch it up the center for a clean hit. Launch the ball through either of the two long ramps bordering the table will fill in a letter in the Samus logo - with all filled and the combat ready message aired hop in the pod and send all your missiles into Thardus (waste any Triclops first with your beam).
If you manage to locate a Special grab it quickly to shave 10 seconds off your final completion time (in Single mission mode). Once you've unlocked the Force Ball in the Impact Crater watch for it appearing along the right-hand ramp, launch yourself up to the top-right corner of the table to grab it before it disappears. If you do manage to grab it, quickly deliver the pain to Thardus - he'll go down fairly quickly.
Finally, if you've spent a Power Bomb and need another, see that small circular pod next to the upper right flipper? Launch yourself into it and watch as small yellow lights slowly fill up around the pod. Keep launching yourself into the pod until all the lights fill up - upon which you'll hop up into the top half of the table as a Power Bomb refill appears in front of Thardus.
Omega Pirate

- Location:
Phazon Mines - Attacks:
Space Pirates, Energy shockwave
The Omega Pirate's cronies will give you much to worry about. Secure the Missile Launcher first if playing on Multi-mission mode to summon the monstrosity.
A trio of Space Pirates will constantly teleport in and hop about the upper table, usually blocking your path to more important targets. Watch out for homing missiles as each will sap a unit of health and send the ball flying with each strike.
The two upper flippers will only come in handy when the ball enters the Omega Pirate's alcove, use them to score a quick hit against the beast as it won't be hard to strike in the cramped space.
Watch out for the primary attack in the form of a nasty shockwave. The blast extends out below, covering the entire lower table. If struck your ball will lose health and be knocked south, be certain to go anywhere but near the drop zone. Launching the ball up the circular ramp will grant sanctuary as the shockwave passes.
Try to hop in the Scan pod on the top-right corner of the lower screen for a bonus, and be sure to use Power Bombs if you have any. See those three purple flashing lights on the left side of the lower table? Strike all three to summon a force field. Also try to grab the force ball as it appears up on the circular ramp if you can.
The Omega Pirate might as well have a giant red target on its face as you shouldn't have any trouble scoring a hit. Only problem will be all those pesky Space Pirates getting in your way.
A good tip is to try filling up the Samus logo by launching the ball around the top ramp enough times to summon the combat ready message. Jump inside the central pod and unload your missiles at the Omega Pirate - each shot will home in and strip off part of its armour - take off all four and the beast will remain stunned for a short time. Use this time to quickly shave off more of the target's health, and don't forget to pick up dropped health units from defeated Space Pirates.
In Multi-mission mode, if you fail an Artifact Temple run and are forced to leave, head back to the Phazon Mines. Defeating the Omega Pirate again will grant you an easy return trip to the Artifact Temple, and the lack of annoying Triclops here definitely helps.
Meta Ridley
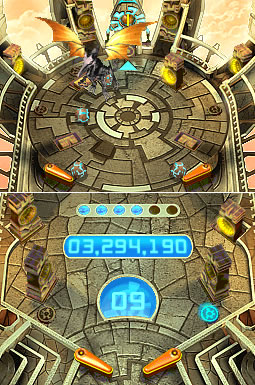
- Location:
Artifact Temple - Attacks:
Bombs
Ridley's the only thing standing between you and the Impact Crater. Upon entering the Artifact Temple a pod will open up in the center of the top screen. Launch the ball into it and watch as it enters a pillar above and the funky artifact holograms appear. They'll morph into six grey balls before launching themselves onto the table as Ridley swoops in.
See the large number 12 displayed on the lower screen? There's exactly twelve totem pillars around the table, each one waiting for a grey ball to enter its open slot. To ultimately clear this table you'll need to send a ball into every totem while avoiding Ridley's bombing runs. Without any way to attack him directly you'll just need to outrun him to the finish.
Losing all your grey balls will fail the mission, if you're playing in Multi-mission mode you'll be forced to travel to another location before able to return for another go. If you're low on ammo send a ball into the pillar directly below the orange ball where a blue arrow flashes to summon an extra grey ball.
With four flippers on the table and six balls flying around everywhere you'll be hard pressed to keep an eye on all of them. First watch the lower flippers and concentrate on keeping the crowd out of the drop zone. Don't worry if Ridley bombs a few, just keep them moving quickly to avoid the barrage. Eventually the chaos will cause some of the balls to get caught in the totems, some may stay inside for a while before popping out again.
When the numbers decline change your focus to the upper flippers to clear the pillars surrounding them. Take care if a few balls streak down towards the drop zone at the same time as they tend to try and push each other down the hole. Eventually with all twelve totems fed the central pod will rise again and a voice prompts "shoot the saucer." So let's do that. Finish the table (and Ridley) by sending a final ball into the pod.
Metroid Prime (1)
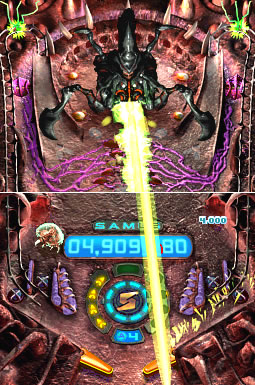
- Location:
Impact Crater - Attacks:
Metroids, Energy laser
Entering the Impact Crater in Multi-mission mode requires you to secure the Force Ball before Metroid Prime makes its grand entrance. This first crustacean form inhabits most of the upper screen, but thankfully you won't have to worry about those enormous pincers trying to slice your ball in half. Metroid Prime's main form of attack comes in the form of a sweeping laser swathing a path across the screen.
This can't be avoided on the lower screen so try to launch your ball up the circular ramp to avoid the torrent. You'll also find the odd Metroid occasionally floating into the arena, make sure they don't block your path. Two Scan pods inhabit the bottom screen so try to send your ball into them to score an easy force field bonus.
Now to take the fight to this thing. Launching your ball into the main body won't do any harm, rather you'll need the Force Ball to do the job. See the two green Force Ball fields at the apex of the upper ramps? You'll need to slam into one of the two claws blocking either entrance of the ramps to clear a path, then quickly send the ball through before the claw bars your path again. If you manage to score a combat ready message, send a single missile into one of the claws to brush it out of the way. Bombs laid near a claw will also work well.
With the Force Ball energized quickly slam into the main body of Metroid Prime to deliver some serious damage. Repeat the cycle a few times to crush the opposition. Grab any health the defeated Metroids drop as you'll certainly need it - that laser won't be easy to avoid. When striking a claw Metroid Prime won't use the laser so don't waste any time in making your move.
Metroid Prime (2)
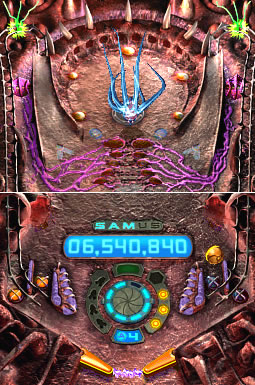
- Location:
Impact Crater - Attacks:
Metroids, Energy laser, Homing cluster bombs
With the tentacled core form of Metroid Prime emerging you'll have your final target. Without its solid shell you'll be clear to send your ball straight into the target to inflict damage. Also try to send the ball up the Force Ball ramps as they'll still be awaiting your presence. Watch out for the homing cluster bombs Metroid Prime spews at you, take extreme care if they strike when the ball's close to the drop zone.
Deal with any pesky gate crashing Metroids and be sure to grab any health they leave behind. Drop bombs if you travel near the main target and be sure to use a Power Bomb if you have one. Using the Force Ball will greatly speed things up, just take care around the drop zone, especially if the ball picks up speed. Try to jump in a Scan pod to score an easy force field bonus. Metroid Prime also still has a potent laser ability, this time directing the blast straight down (oddly it covers the drop zone so you'll simply take damage by touching the beam, but can't be knocked down the hole). Stay on the upper screen to easily avoid the laser.
Conquer Metroid Prime in Multi-mission mode, then sit back and enjoy the credits! Strangely enough, right after the credits you'll be dropped back to the Select Destination screen... so carry on and see how far you can make it again on Expert mode! You'll also now have the Expert mode option waiting in the Options screen.