


Data
Guides and strategies
- Techniques Guide
- Power-up locations
- Bosses Guide
- Mini-bosses Guide
- Search View Guide
- Obstacles Guide
- Walkthrough
- Game endings
- Secrets and tips
- Game maps
Media
Mini-bosses Guide

Samus will see a vast amount of action in this adventure. All manner of hostile lifeforms inhabit the Bottle Ship - most of them lie somewhere between the classification of normal enemies and bosses. Therefore the following "mini-bosses" are in a league of their own - Samus is often forced to fight them to unlock a sealed area. Read on for details of what to expect and how to survive an up-close encounter.
MINOR SPOILER WARNING: Creatures not encountered until further in the game are revealed here - be wary of spoilers.
Note: Some locations of Mini-boss encounters are only seen in Normal mode. These locations are marked with an "N".
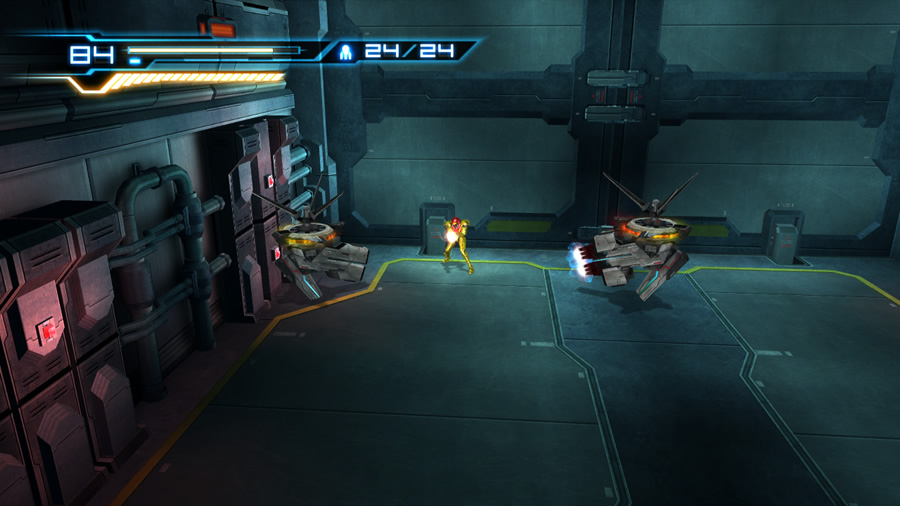
Sidehopper
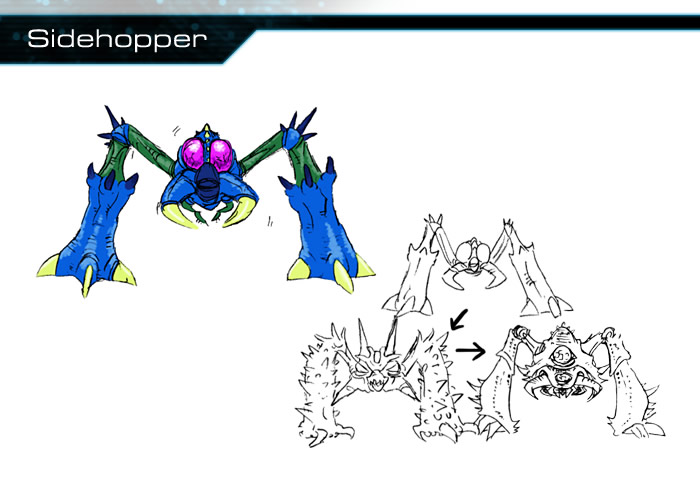
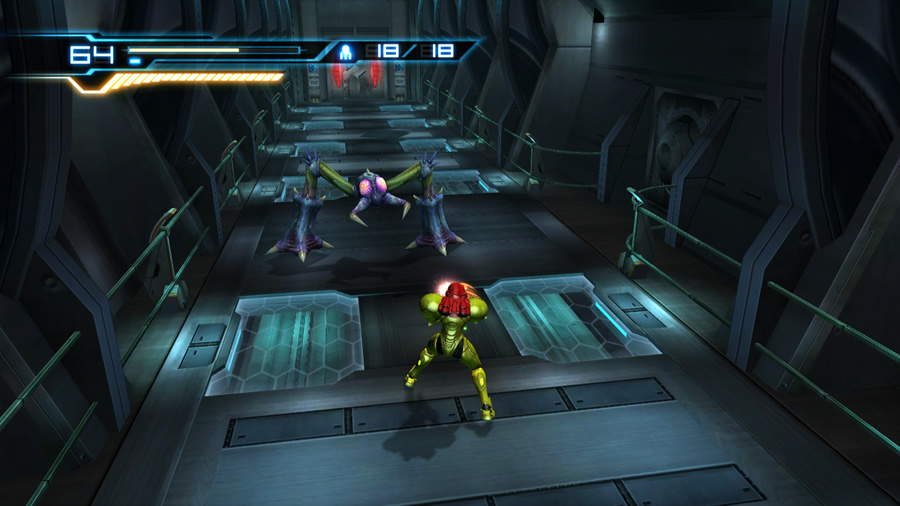
- Locations:
Main Sector, Sector 1
These blue-legged fiends should look familiar to Metroid fans. All they ever enjoy doing is hopping around while trying to stomp on Samus.
Each timely stomp is preceded by a short pause as the Sidehopper winds up the attack - take this as the cue to vacate your position, or perform a Sensemove before it lands to keep clear.
Missiles and concentrated fire work well against these targets, or use an Overblast to finish them off quickly.
Ghalmanian
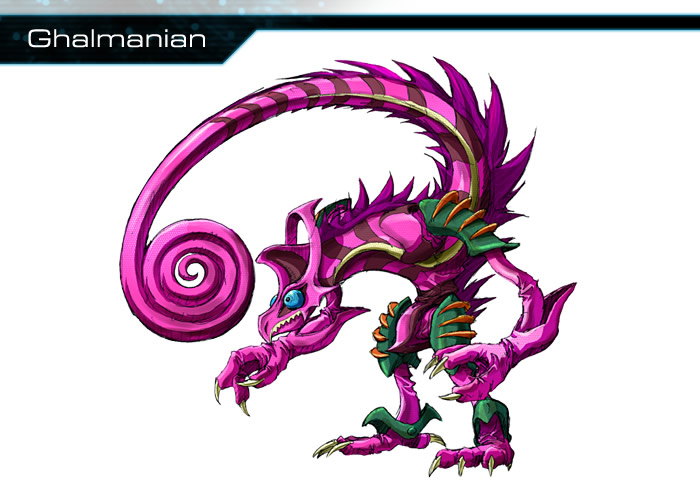
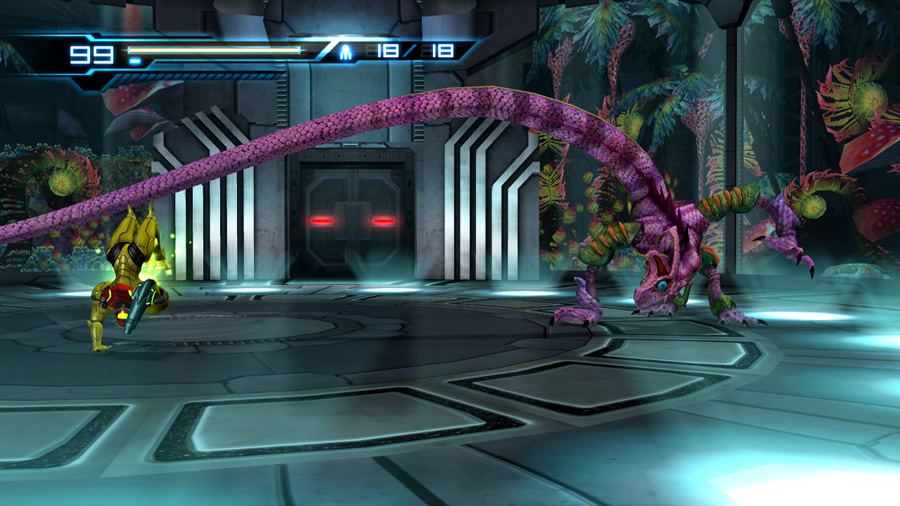
- Locations:
Main Sector (N), Sector 1
These overgrown chameleons are not friendly. They'll often use their huge tails to try and ensnare Samus before whipping her around the environment - if you're caught try to shake free by pressing the D-Pad repeatedly. They'll often turn invisible before spitting large globs of green muck at Samus - use the Sensemove to keep clear.
The target will remain invisible as long as it wants (unless it becomes visible to perform a melee attack). Put your back to a wall and enter first-person view, then sweep your view around the chamber. Eventually you'll lock onto the target despite its active camouflage - quickly release a Missile to reveal it (use the Sensemove if any green globs are coming your way).
A visible Ghalmanian may either try to whip Samus with its tail, run up and head-butt her or poke its incredibly long tongue at her. Keep yourself moving and charge your weapon while Sensemoving - release a blast whenever you can.
One good way to finish off these pests is to stun them with a Missile while they're invisible. Scoring a Missile hit on the invisible Ghalmanian often sends the target slumped to the floor, momentarily dazed. Quickly run up and perform a stylish Lethal Strike to finish it off.
Griptian
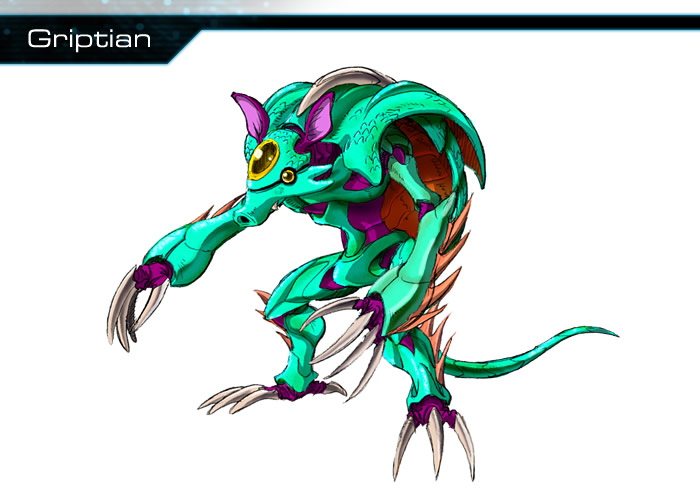
- Location:
Sector 1
Griptians are fiercely aggressive armadillo-like creatures. They won't hesitate to roll into a ball and madly try to slam into Samus - be ready to Sensemove a lot. They may also burrow underground before leaping up underneath Samus. Keep moving and have the good old Sensemove ready to counter the emerging Griptian. When above ground and in a normal stance, watch out for their lunging and leaping attacks.
Don't waste any time firing at the Griptian whether it's standing or rolling around. Charge your weapon and Sensemove away from the rolling attack before opening up to give yourself a good chance at a hit. If you do manage to nail a Griptian with a charged hit while it's standing, watch as the creature takes a minor stumble. Quickly approach and leap atop the target to perform a successful Overblast.
Score an Overblast and the target will slump to the ground - move in with a Lethal Strike to end the fight. Griptians often attack in groups; focus on one at a time to thin out their ranks.
Alternate method: Special thanks to Whitzard for this trick! If you simply enter Morph Ball mode and lay a few bombs around a Griptian, the minor explosion(s) will knock it over, straight into a vulnerable Lethal Strike position. Whether they're standing or rolling around, bombs will work every time against a Griptian. Once the explosive works its magic, move in and perform a Lethal Strike.
Dragotix
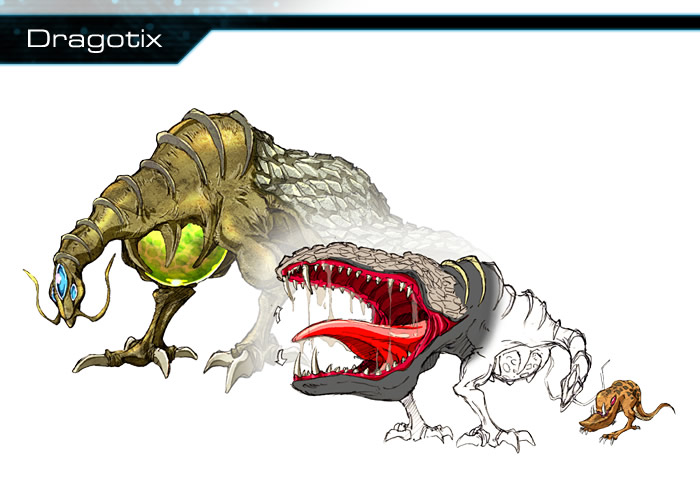
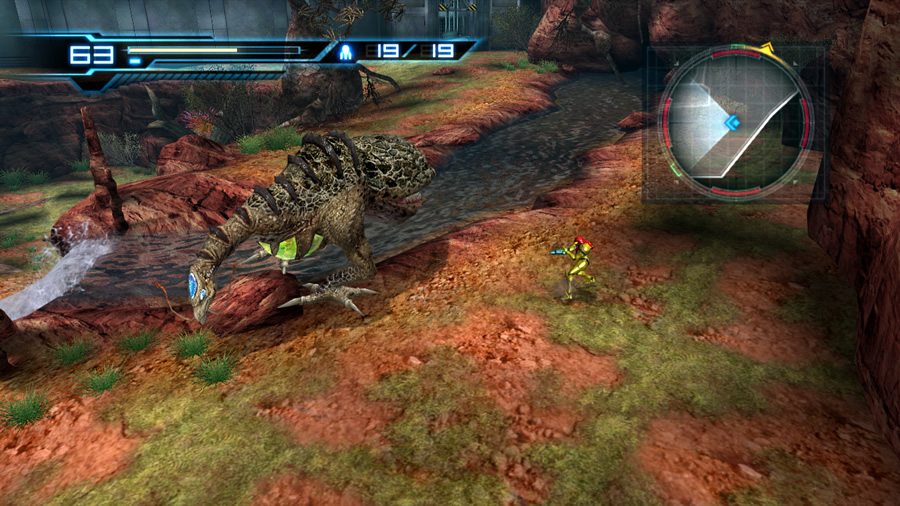
- Locations:
Sector 1, Sector 3
This is one weird monster... The small head of the beast will spew blue flamebreath at you, while its "tail" will often flip around and proceed to try and eat you. Producing creatures with a head on either side of their bodies must be difficult though, as there's only two of them to be seen in the game. You'll discover the first one fast asleep in a lush environment in Sector 1. Well, that is until a monstrous shriek from an unseen-creature wakes it up.
The Dragotix is actually quite docile if you keep out of its zone of perception. Both chambers where they live will not lock you inside, so feel free to slip by and leave them to forage in peace (try reactivating the hologram generator in the Sector 1 chamber for fun).
FG-1000

- Locations:
Sector 1, Sector 2, Sector 3,
Bioweapon Research Center (N)
These rogue security robots have lost their original masters, so naturally they're hostile to everything now. They tend to travel in packs and love to try and ram Samus senselessly. Their electronic beeping and whining generally gives away the attack - watch for them slightly recoiling before they fly forward to time your Sensemove properly. They'll tag-team the ram attack with each other, so be ready to Sensemove more than once.
Without the Screw Attack or Wave/Plasma Beam, you can only harm these units when they charge up their main cannon. The cannon glows before discharging a bolt of plasma - keep running around and Sensemove to avoid the blast. You can harm the unit by quickly delivering shots into its cannon as it charges. But to finish it quickly, try to fire a Missile into the cannon as it charges up. Scoring a Missile hit at extremely close range seems to work more effectively than long-range blasts.
As you focus on one unit while in first-person view, other FG-1000 units might try to interfere and ram you. Watch for any movement and react quickly with a Sensemove.
Groganch
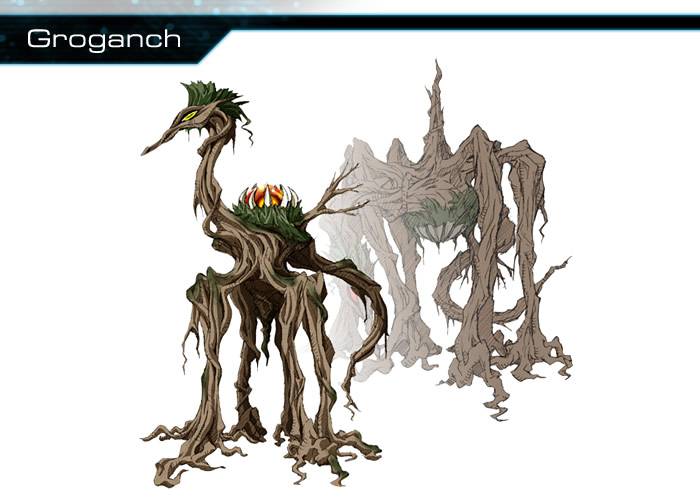

- Locations:
Sector 1, Sector 2
These odd tree-like beasts almost seem docile at first, until you realise that those small purple orbs they discharge are heading right for you. Due to the creature's size you'll want to keep your distance at all times - those enormous stump-like feet and even the creature's head are often used against those who travel too close. If the beast is too close and enters a frenzy, hit the dirt and quickly Sensemove a few times to survive its rampage.
At a distance, the purple orbs are your biggest threat. Either Sensemove if they land too close or shoot them down while they're still airborne. The Groganch's weakness is the large orange bulb on its back - lock on and fire Missiles to inflict heavy damage. Don't be discouraged if the purple orbs interfere with your shots, just stand well back and keep firing.
Eventually the creature will perform an odd acrobatic move and flip itself over, switching the orange bulb to its underside. Keep locking on and don't stop your Missile barrage. Watch out for the creature's surprising agility, as it can easily close the distance between itself and Samus rather fast. Finding a higher position to attack from works well to avoid any melee attacks, but you'll need to watch out for the purple orbs at all times. Sneak in a Super Missile hit in later encounters to speed things up.
Cyborg Zebesian


- Locations:
Main Sector (N), Sector 1
Now how could we have a classic Metroid game without some classic Zebesians? These foes are just like how we remember them, only this time they're equipped with cybernetic enhancements.
Zebesians have no trouble in firing energy projectiles at you - luckily the energy blasts travel rather slowly so you'll have plenty of time to leap or Sensemove out of their way. Open up with all you've got - don't be afraid to try out a Missile or two, and use the Charge Beam in tandem with Sensemoves to pull off quick shots.
Zebesians may also move in close and use their claws in melee combat, or try to grab Samus and hurl her across the room. If a Zebesian does grab Samus (the game will slow down slightly), rapidly press the 1 and 2 buttons to break free with a stylish roundhouse kick.
You can also try to Overblast any type of Zebesian to weaken them further - just be quick as they'll snatch Samus off their head and inflict physical damage if you're too slow. Some of the Zebesians may be equipped with a larger arm cannon replacing one of their claws. These suckers discharge missiles - don't be a victim of them. Keep your distance and simply Sensemove the incoming projectile.
The Ice Beam works fantastically well against Zebesians - it'll freeze their claws so they can't fire any projectiles until they thaw out. If you ever spy a Zebesian falling over and appearing momentarily stunned, move in for a Lethal Strike. Zebesians tend to travel in packs and enjoy surrounding Samus, so be ready for a Sensemove dance and don't fire until the air is clear of their hot green plasma.
Dessgeega


- Locations:
Sector 2, Sector 3
These tough customers are the stronger cousins of a regular Sidehopper. They'll stomp towards Samus surprisingly fast - and the spikes covering their legs can leave nasty scratches.
Keep your distance and watch out for fast stomping attacks; a Sensemove will keep you safe.
Watch out if a Dessgeega spews a glob of slime at Samus, if caught she'll be immobilised for a second. Press fire and jump rapidly to break free before the creature closes in. They may also try to swat you with their legs, just keep your distance and be wary of their speed.
Open up with charged blasts of the Ice Beam to damage the Dessgeega and freeze one of its legs, rooting it to the ground. Quickly follow up with an Overblast to deal further damage. They have quite a bout of stamina - keep up your freeze/Overblast attacks to finish them safely.
Asborean

- Locations:
Main Sector (N), Sector 3
These wall-loving beasts are actually a serpent creature encased in a huge suit of crab-like armour. The first one you encounter will immediately lunge at Samus - Sensemove quickly to avoid the opening move. The beast enjoys retracting into its armour and skimming around the environment trying to run into Samus. Jump or Sensemove the onslaught to leap clear, but watch out when it deploys a group of smaller Asborean Spawn. These pests will slither right at Samus and self-destruct. Fire at the spawn or use the Sensemove to keep Samus safe.
Eventually the Asborean will return to a standing position and try to use its pincers to grab Samus. Keep your distance and don't touch its spiked shell at all. Don't be surprised if the smaller spawn occasionally pop out of the Asborean while it's still standing.
Any shots fired at the Asborean's armour will bounce off harmlessly, and unfortunately its weak point won't be available most of the time. Normally the Asborean will straighten its posture before it retracts into its armour and skims around the floor. Sometimes, instead of entering this state it'll expose a glowing red underbelly for a moment. Don't miss your chance; keep the Charge Beam ready and release a blast as soon as this rather obvious weak point appears.
It may also perform a fancy two-step move and lunge at Samus with one pincer at a time, but by doing so it completely exposes its underside. Oddly the creature will slow its movements at this time, so don't miss your chance to deliver more damage.
The Asborean's nastiest attack is during its skim around the floor. If it pauses, flailing and snarling its head and pincers - watch out. The beast will lurch toward Samus and try to catch her - if it grabs hold you're in for a world of hurt.
Incidentally, try to let loose a Charge Beam blast into the head before it lurches forward. Normally there's bound to be several Asborean spawn slithering around, so it might be difficult to score a successful hit through all the interference. Keep your Charge Beam ready at all times. As soon as you see the head extend, Sensemove any remaining spawn. Once all the spawn are gone, and if you still have time, blast the Asborean in the head with a fully-charged shot before it reaches Samus. Be patient and willing to jump or Sensemove the Asborean if it lunges too quickly.
If you do manage to nail the Asborean's head, the creature will slump back, completely stunned. Move in and perform a Lethal Strike to witness an odd event. Samus will literally rip the serpent out of the armour, destroying the armour and leaving the serpent defenseless.
It's not out of tricks however. Run away and don't stay in close proximity - the serpent will try to latch onto Samus and self-destruct, which is not a good way to end this battle (most especially on Hard mode!). Strike it with a well-aimed Charge Beam blast or Missile to conquer the target. However, the creep might slither and dodge your projectile. So to ensure safety, move as far away as you can and up to higher ground, then pound it with Missiles.
If you don't manage to stun the armoured Asborean and Lethal Strike it, keep attacking the glowing red underbelly to eventually finish it off. However, further into the battle, try your luck and release Charge Beam blasts at the still-armoured Asborean (especially if it disgorges spawn while still standing) - sometimes a lucky hit might stun the creature and leave it open for a Lethal Strike.
You'll need to learn the Asborean's attack patterns quite well - this fast and furious encounter will need plenty of practice to overcome. Just try to anticipate the Asborean's lunge attack while it skims around, then exploit the Lethal Strike. Lastly, if you encounter an Asborean after gaining access to the Screw Attack, give it a try...
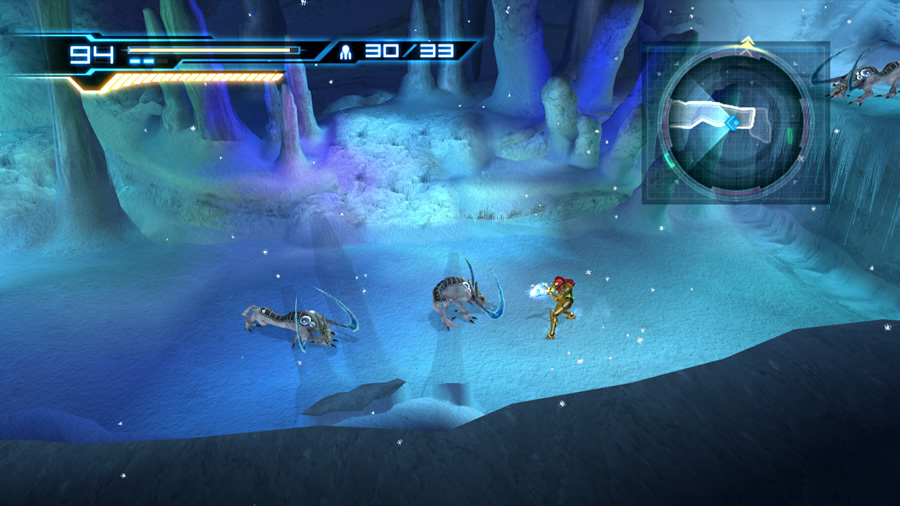
Volfon

- Location:
Sector 2
These three-legged wolf-like creatures inhabit the snowy regions of Sector 2 and always travel in packs. They shouldn't be too much trouble for an agile Samus - keep moving and Sensemove whenever they give chase. The Volfons will primarily use their nasty sharpened scythes in combat. They tend to wind up for an attack, so watch for the scythes glowing blue to give you a warning. Use a Sensemove if they try to leap atop Samus.
Thankfully your Ice Beam will help against these beasts, despite their affinity to cold. Open up with charged shots - especially if multiple targets cluster together. A direct hit should freeze the Volfon's rear leg and snag it in a block of ice. Stand back and watch the movements of any non-frozen targets. Enter first-person view when safe. Fire a Missile at a trapped Volfon to finish it off, or keep striking the target with charged blasts to eventually conquer them.
Gigafraug
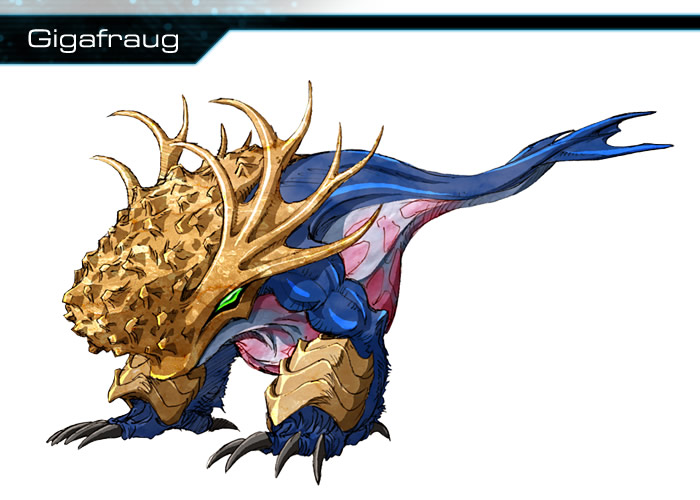
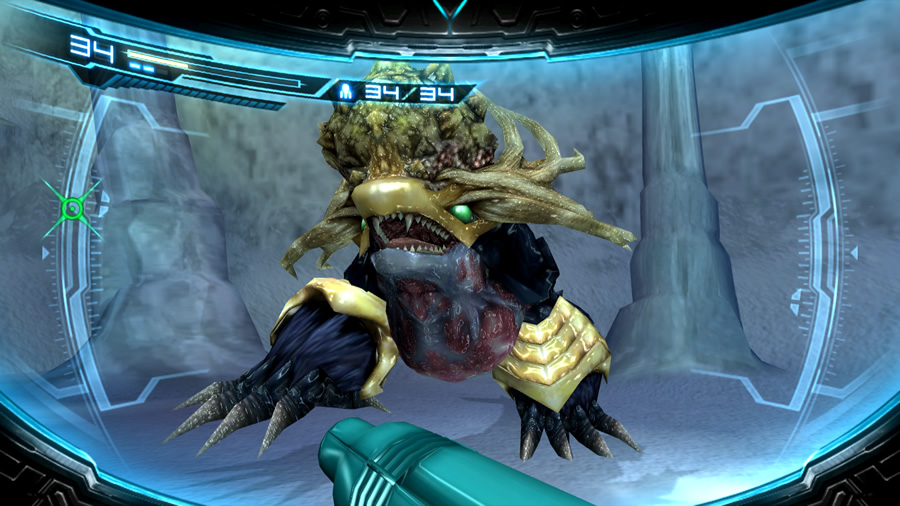
- Location:
Sector 2
This lumbering beast must have something against Samus' choice of wardrobe. It'll attack without provocation, trying to crush Samus to a pulp with its enormous head. If the creature stomps toward Samus, be ready to Sensemove clear. It may also leap into the air and try to flatten Samus from above - this attack is extremely annoying and can easily sap your health - stay on the ground (don't jump) and Sensemove just before it lands.
The lumbering beast has some sort of tractor beam ability allowing it to land directly on top of Samus, even if it's facing away before jumping (and regardless of the distance), so you need to be grounded to Sensemove at the right moment.
At first, attacking the creature directly doesn't seem to work thanks to the thick armour covering its head, so let's even things up. Put some distance between Samus and the target before entering first-person view. Target the creature's head and release a Missile into it to crack open the shell and reveal a weak point underneath.
Open up with charged shots to weaken the beast - try jumping atop the head for an Overblast too (but hold on tight! It'll try to shrug Samus off). The Gigafraug won't slow it's rate of movement down at all, be vigilant and persist your Sensemoves to avoid its frantic attacks. If you manage to eventually stun the creature, move in as it slumps to the ground and finish it off with a Lethal Strike.
Kyratian

- Locations:
Main Sector (N), Sector 2
This unpredictable bipedal... something... is often a tricky customer. The Kyratian is equipped with two plasma launcher turrets on its back, and packs a number of nasty melee attacks. Purple plasma balls launched at you should be easy to dodge (electricity always surges up the creature's back before the turrets fire), simply Sensemove to stay safe. Try to keep your distance from a Kyratian at all times. They tend to unpredictably perform several melee attacks in rapid succession when close by (a whipping from its whip-like turrets or a nasty slide-kick). Stay away if tries to leap atop Samus - otherwise it'll immobilise her with an electric shock.
Open up on the target with charged Ice Beam shots to freeze the turrets on its back with a direct hit. That should slow it down for a while, but the melee attacks won't stop. Don't be discouraged if the Kyratian manages to reflect Samus' attacks with a twirl or kick (do a barrel roll!) - just move in closer and keep trying.
Eventually the Kyratian will deploy an orange energy field, completely protecting itself from energy weapons. In this state its plasma projectiles are injected with more pain - especially watch out if the creature launches into the air and either tries to slam down atop Samus or discharges an enormous ball of steaming plasma.
Give yourself some space and quickly enter first-person view. Lock-on and fire a Missile to disable the creature's shield and even the playing field. The annoying beast hops around constantly so your Missiles are going to have a tough time homing in. Try to catch the beast off-guard or catch it with a Missile when it pauses to attack.
Once its shield is out, return to normal view and resume your charged shot attacks. If you're feeling ambitious, try to leap atop the Kyratian and perform an Overblast - just be very quick about it otherwise the creep will kick Samus to the ground. No doubt the orange shield will deploy again, so break out your Missiles to render the Kyratian vulnerable again.
Watch your health closely and don't take the Kyratian for granted; its fast melee attacks can easily drain your health just as quick - especially on Hard mode. Keep an eye on the beast when it takes a charged Ice Beam hit. If it stumbles backwards to the ground, quickly move in for a Lethal Strike to finish it off (you'll have roughly one second to do it). Another oddity to keep in mind: if there's a body of water nearby, try knocking the Kyratian into it - these guys can't swim - or is it all that electrical gear they carry? But once you have the Screw Attack, give that a whirl...
Fumbleye

- Location:
Sector 2
These odd specimens look somewhat familiar... A Fumbleye is permanently attached to the ceiling of the chamber it inhabits, but it can make use of ranged projectiles to strike Samus from afar. It can lob a large blob of green slime straight at Samus' position (by "crying" it like a teardrop), so be ready to Sensemove when the slimeball travels too close.
A Fumbleye's true danger, however, lies in its barbed tentacle. That thing is certainly not for decoration - when Samus travels too close the tentacle will whip towards her in an attempt to grab hold and immobilise its prey. If the Fumbleye manages to ensnare Samus, it'll suck away some serious health before hurling her away. You can try to leap over the tentacle but its sheer speed can prove difficult to avoid. Instead, listen for a grumble from the Fumbleye - it always occurs right before the tentacle strikes. Tap the D-Pad repeatedly at this point to Sensemove at the right moment.
Initially nothing can harm the Fumbleye, forcing you to simply avoid its attacks when travelling through its home. Naturally its eye is the weak point. Once you have access to Super Missiles, the Plasma Beam, the Screw Attack or Power Bombs, use one of them to send this creature on its way.
Super Zebesian
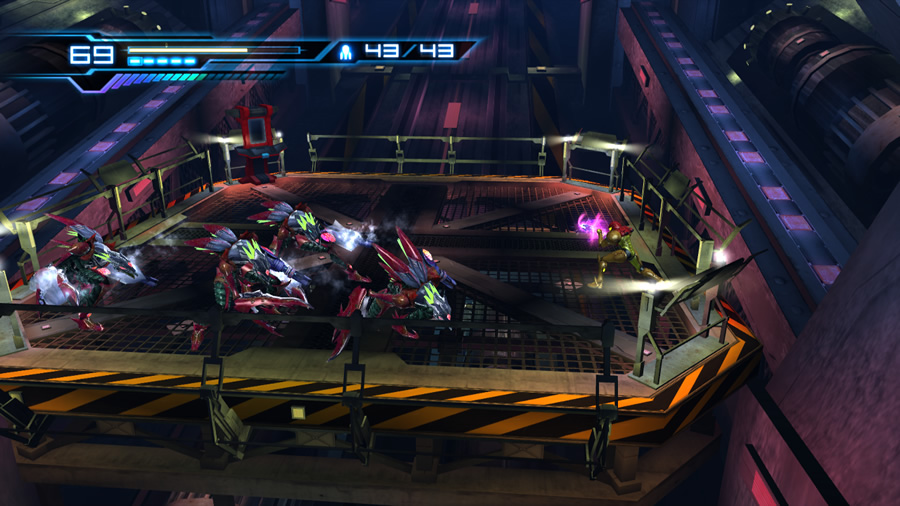
- Locations:
Main Sector (N), Sector 1, Sector 2, Sector 3, Bioweapon Research Center (N)
These red-coloured Zebesians are upgraded versions in both attack and defense. They're equipped with a Wave Beam-like weapon and are generally more aggressive than their regular counterparts.
A Super Zebesian might fire a regular shot, a multi-blast shot, or a charged blast capable of passing through glass. If their claws are frozen, they can also perform a jump attack - be ready to Sensemove if they leap into the air (they tend to land atop Samus very quickly). Don't try to Overblast these pests without harming them first or freezing their claws, otherwise you'll be shrugged off before scoring a hit. Use the Sensemove to easily avoid their projectiles, and try to freeze their claws as quickly as possible.
Hold your ground against these Zebesians - they can take an enormous amount of punishment from your beam. Oddly, two direct Missiles can finish them off instantly. Generally, you'll mostly find these Zebesians hard to deal with in groups, so keep up your Sensemoving and only return fire when it's safe. Stay away from them too, otherwise they might deliver a nasty roundhouse kick.
Charged shots work well against clusters of Zebesians, thanks to the Diffusion Beam's spread. Use single blasts if safe openings are hard to come by, but always be ready to Sensemove their projectile attacks.
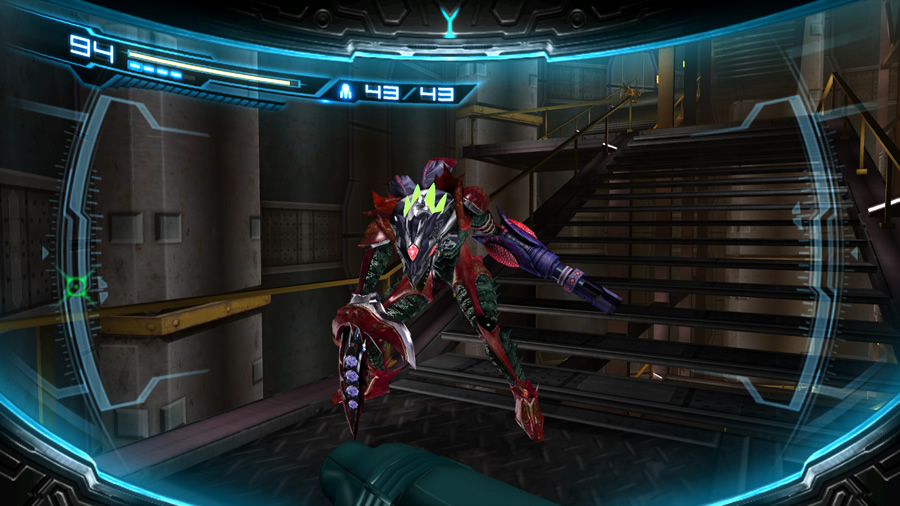
Rhedogian
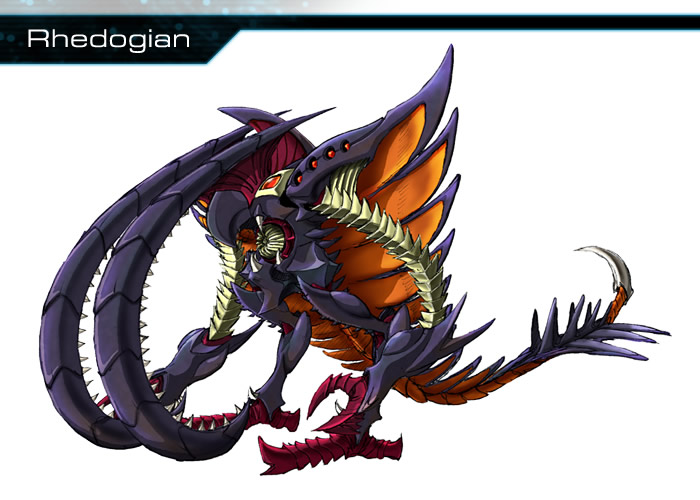
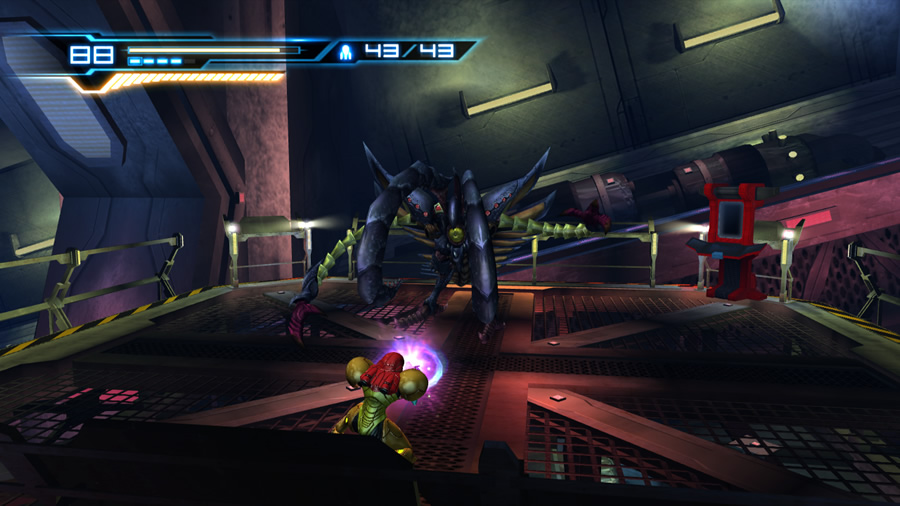
- Locations:
Main Sector (N), Sector 1, Sector 2, Sector 3
This monster is the mini-boss king of mini-bosses. Its massive mandibles, tail and skinny arms make it look like something more suitable in an ocean, but sadly it has no trouble attacking Samus in any environment. The Rhedogian is an absolute pest, and one member of its species will be encountered in the game on four separate occasions.
Essentially the Rhedogian will use the same attacks in each encounter with only a few variations. This monster won't stay out of Samus' face - its melee attacks are incredibly fast and easy to fall victim to. Watch it carefully - the monster will reel itself over to Samus and swing its extendable arms at her, usually followed up with a swipe from its tail.
Don't jump - Sensemove each of these melee attacks on the ground and keep your Charge Beam ready to fire at the beast as soon as an opening appears - but always wait for the full combo attack of claw swipes and tail whips to end, before firing.
It can also grab Samus in its mandibles and slam her to the ground - Sensemove to clear it safely. You might find yourself doing nothing but Sensemoving - which is a very good thing. This is where mastery of the Sensemove will pay off. Learn it, practice it, and don't stop using it. The Rhedogian will also deploy a homing missile launcher - simply Sensemove as much as you need when the missiles travel close. Release a charged blast back at the target when the air is clear.
As you fire at the creature's face to harm it, you may find that the monster is easily capable of sidestepping all your shots with its Inspector Gadget arms. Instead, use the Charge Beam together with the Sensemove and release the blast right after the Rhedogian finishes an attack combo. Eventually you may see ice forming on the creature's mandibles - strangely this doesn't seem to have any effect on it.
Soon enough the beast will stand still and its eye/face will glow purple. A thick purple laser beam promptly pierces the air directly towards Samus. Luckily the monster can't sweep the beam around, so quickly Sensemove once or twice to leap clear. Fire into its face before the beam finishes to score a few hits. If the Rhedogian's eye/face ever glows red instead, immediately enter first-person view and launch a Missile straight into it. But check your position first - if Samus is standing close enough to the Rhedogian, the monster will disengage the attack and try to melee strike her instead.
Use a Sensemove to avoid the surprise attack, and don't let the Rhedogian's red eye/face charge up for too long. Otherwise, a killer red beam will be fired at Samus - something you especially don't want on Hard mode. Before the laser can be fired, stand back and shoot a Missile into the Rhedogian to ensure Samus' safety.
Fighting this beast in Hard mode is nothing short of a nightmare. You won't have much time to use Concentration to recover health, so avoidance of everything it throws at you is critical. Sensemove all the way. Sending a Missile into the Rhedogian's eye/face as it glows red, or when the creep begins sucking air into its maw before firing the regular laser, should immediately stun the creature. Take your chance and move in for a Lethal Strike.
Amazingly, the Rhedogian will survive the Lethal Strike, but is now without its weird mandibles. During one of the later battles the beast will now take to the skies and continuously air-bomb Samus with round-after-round of homing missiles. In all encounters, hold out as long as you can against the creep and eventually it'll retreat - except during the final fight of course. This is one battle where practice definitely makes perfect - hone your skills and don't give up!
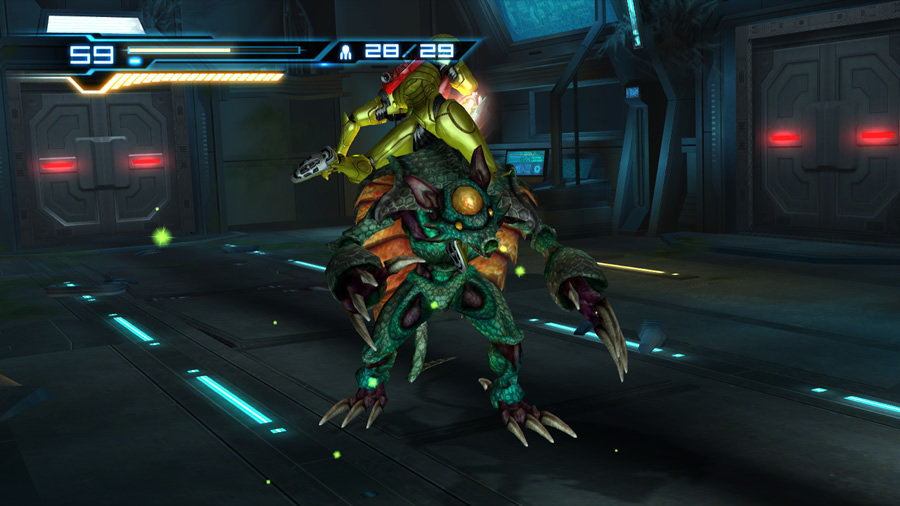
Mighty Griptian

- Locations:
Main Sector (N), Sector 1
This variant of the Griptian is mighty indeed... Essentially they boast improved defense and attack capabilities to their predecessors. A huge set of razor-sharp spikes extrude from the creature's back, and they use these to deadly effect when rolling around in a ball. Use the same tactics as before - Sensemove away from the rolling attack and release a charged blast at them in retaliation.
They can still burrow under the ground before attempting to ambush Samus from below - thankfully their movements are given away fairly easily by trailing debris. Leap or Sensemove away when they emerge.
Watch out for a vicious two-swipe claw attack. Overblasts don't seem to work, even after forcing the Griptian back with a charged shot, so stay on the ground and stick to regular weaponry. Try using a Super Missile too - often they can put one Mighty Griptian down and stun another nearby target. Amazingly, these crazy critters can survive multiple hits from the Screw Attack. However, just like regular Griptians, the Mighty Griptian is also vulnerable to Morph Ball bombs. Lay some bombs around one of them to eventually trip it over, leaving the target vulnerable to a Lethal Strike.
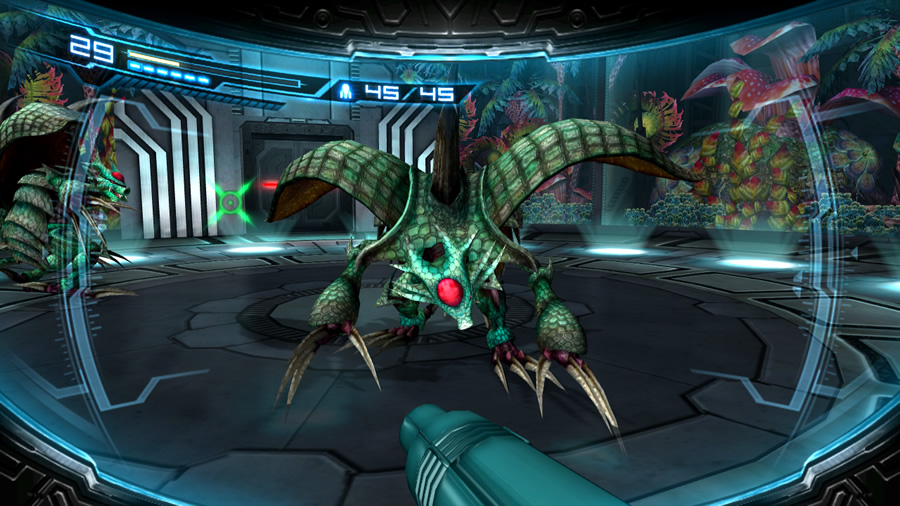
Desbrachian
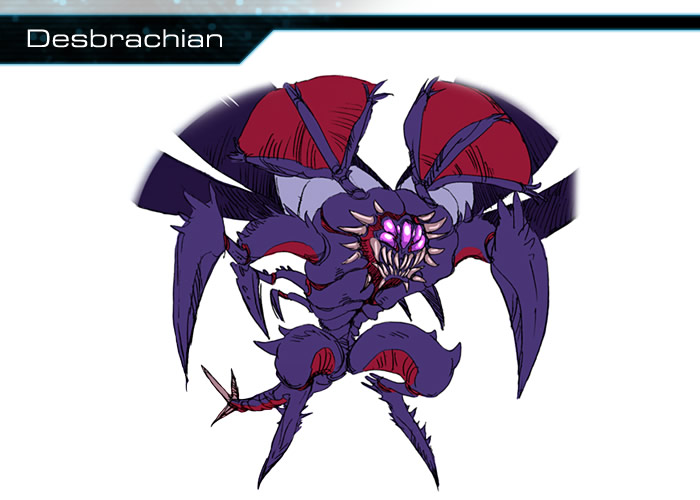
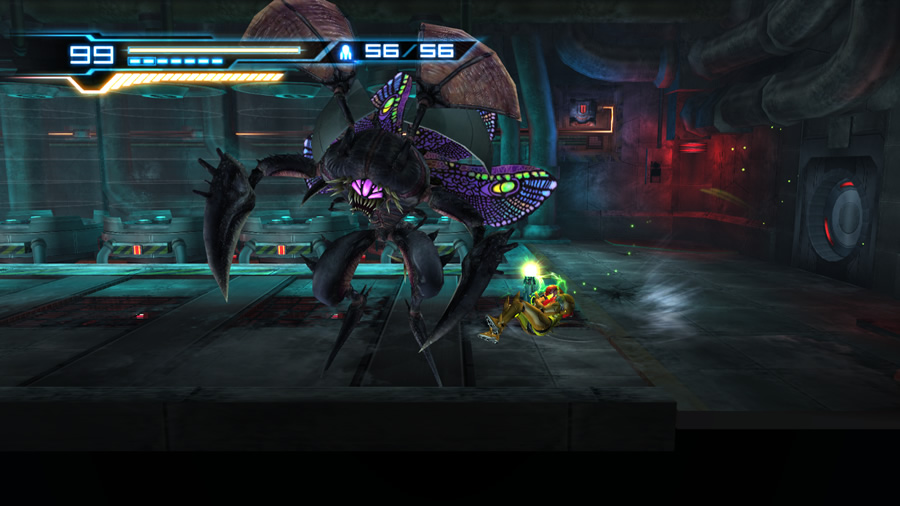
- Locations:
Main Sector (N), Sector 1 (N), Sector 2 (N), Sector 3 (N), Bioweapon Research Center (N)
These monstrous bugs emerge from a Power Bomb blast shield whenever you disturb their slumber with a Power Bomb. It'll be necessary to fight them in order to unlock whatever it was they were guarding, so let's jump right in. These foes will test your Sensemove skills to the edge - their lightning-fast melee attacks can easily overwhelm unwary travellers.
First things first, try to avoid jumping. The Desbrachian tends to grab Samus almost the instant she jumps before slamming her back down to the ground. Fire at the creature immediately, and try to use charged shots in tandem with the ridiculous amount of Sensemoving you'll be performing. These creatures can sap Samus' health frighteningly fast with their razor-sharp claws, so practice your defensive technique well. Don't be discouraged if they dodge Samus' shots, just keep Sensemoving and try to release a blast after the Desbrachian finishes an attack.
Some of their attacks take a few moments to charge up, so use this time to deliver more hot steaming plasma. You can also try to use Missiles and Super Missiles to speed things up, but the target's sheer speed and ferociousness makes this tactic unwise at times.
A quick and easy way to conquer a Desbrachian is with a Lethal Strike. Eventually with enough of a pounding, the bug will slump forward, tired and stunned (note that by now it's turned a reddish hue). Move in quickly to finish it off. If you damage the Desbrachian too much without performing a Lethal Strike, chances are it'll retreat into its shell and regenerate its health. Quickly lay a Power Bomb as the shell glows green to force it back out, then keep up your attacks up until it's vulnerable for another Lethal Strike.
Alternate method:
Special thanks to Max for this tip. If you miss the opportunity to use a Lethal Strike, fear not. Even though the Desbrachian may regenerate its health, you can eventually defeat it without a Lethal Strike. After it regenerates its health a number of times it'll begin turning a deep angry red. Keep pummeling it to finally conquer your foe.
Second alternate method:
Thanks to The Ogvernment for this tip. As soon as you awaken the Desbrachian, exit Morph Ball mode and stand back. Fill up the charge gauge, then enter first-person view (keep holding the 1 button for a quick charge, saving time while in first-person view). Lock onto the Desbrachian and fire a Super Missile - score a direct hit to momentarily stun the creature. Very quickly fire two more Super Missiles at it to instantly defeat the Desbrachian. If you're fast enough, the Desbrachian won't even be able to make a move.