


Chapter 1: The Alimbic mystery
Samus brushes up on her combat skills before taking the fight to the Alimbic Cluster.
Welcome to the Alimbic Cluster, home of the crumbling ruins of the Alimbic Empire and the odd Zoomer. Upon receiving your mission briefing from the Galactic Federation and watching a snazzy clip of Samus arriving, you'll find yourself overlooking the starfield within her ship. From here you'll have a starchart mapping out locations in the Cluster, for starters you'll be given the Celestial Archives.
With no other choice available, select this location to land aboard the ancient space station.
Hop off Samus' gunship once you gain control and take your time familiarising yourself with the unusual controls (don't forget that thumb stylus). The Celestial Gateway lacks any danger, so feel free to jump about and aim around. Before leaving via the only exit, fire up the Scan Visor and take a look around for scannable objects for your Logbook. Scan your gunship first, then look for a scannable control terminal beside it to learn more about the Celestial Archives.
Spin around and take a look at the exit ahead. See those two inactive pods on the ground either side of the door? Scan them to reveal them as inactive teleporters; once their partner's activated deeper in the station you can use them for quick transit back here. Scan the door itself to learn that a shot from any weapon will open it, then scan the object above the door for your first Alimbic Lore entry.
This one is Alimbic Prophecy 01, don't worry if you can't make out a word of what it says, it'll all become clear later on. Bear in mind that some Alimbic Lore icons aren't hovering above an object, so you'll only spot them with the Scan Visor active.
Exit the chamber and move through the winding tunnel beyond. Through here lies the Helm Room, a large elongated chamber housing an elaborate piece of machinery. Step forward and switch on your Scan Visor again. Look for the Synergy Drive straight ahead near the observation window and pick up the Synergy Processor at the base of the column.
Stroll up the ramp over on your right and take a look at the two tall orange columns at either end of the deck. Scan both columns to learn of the origin of the mysterious telepathic message that started this hunt.
Once you're done, step over to the sealed door on the wall ahead. The game will highlight the large switch beside the door, so simply scan it to unseal the door (scan the door first). Step through and beyond the adjacent chamber to find yourself sealed inside a large open room. That can't be good.
Strange robotic drones promptly appear to ruin your day, so let's make sure that never happens. Scan one to reveal them as Psycho Bits v1.0 (weird name???), then move around to make yourself a harder target and open up on them.
Clear them all and move on. Beyond lies the Meditation Room, blast your way through the crates blocking your path and scan any health popping out of them for your Logbook. Travel down the long ramp ahead and switch on your Scan Visor at the base. Scan the Alimbic Panel along the orange wall and leap over the crates blocking your path.
Scan the Navigational Chart on the blue wall ahead before heading through the opening in the wall there. Inside this adjacent chamber look for the Tetra Trade Map and Synergy Strut Logbook entries. See that small creature floating about down below? Scan it to reveal it as a Petrasyl; these things won't hurt you unless you get up close and personal with them.
Head over to the door ahead to find it sealed with a brown blast shield. Scan it to reveal that a single missile will do the job, only problem is that Samus forgot to load up her payload. Not to worry, look for the Petrasyl and destroy it to reveal a missile refill. Scan it first before grabbing it, then break your missiles out and use one to open the door.
Beyond here lies Data Shrine 01 - the first of three. Travel left and take note of the narrow tunnel beneath the platform. Beyond in the curving tunnel lies more Psycho Bits waiting in ambush, take them out and keep moving. Further along you'll be stopped as your gunship sends warning that an unknown vessel has just arrived aboard the station (handy that). Step forward to locate a narrow door on the right wall, open it up and step inside to reach the central area of this shrine.
The doors will promptly seal as you enter (naturally). Break out your Scan Visor and look for the Science Hub and Alimbic Artifacts entries. With both secure, see the tall cone-shaped shield atop the platform in the center? Scan the Artifact Shield itself, upon which you'll be joined by a number of Psycho Bits above.
Drop down to the floor and take them out one by one. As you destroy each more waves will gradually appear, use your radar to track down any out of range and finish off every last one.
Upon clearing the area a small orb will promptly materialise beside the Artifact Shield. Scan this object to reveal it as a Shield Key. Pick it up to instantly deactivate the Artifact Shield, revealing Celestial Archives Cartograph Artifact 01. What the heck is this thing used for you ask? You'll find out soon enough.
With the artifact secure, exit the chamber via the door where the two blue pillars stand either side. Quickly turn left and open up on the Psycho Bits firing at you beyond here.
Drop off the platform into the winding tunnel and use the Morph Ball to reach the missile refill through the narrow tunnel behind you if you need it. Further down this tunnel you'll spot an energy refill inside another narrow tunnel. Activate the Morph Ball and go inside, but don't stop after picking it up. Down the end of this tunnel lies Energy Tank CA.01, make sure you don't miss it.
Head back down the tunnel and stand up at the exit. Jump atop the platform and move forward, you should notice the exit ahead is sealed. Step forward for a nasty greeting by a small two-legged creature. Scan it for your Logbook, this Lesser Ithrak is certainly not friendly. Watch out for its lunge attack, open up and defeat the creature to unlock the door nearby.
If it drops a blue energy refill make sure you scan it before leaving. Beyond here lies Fan Room Alpha - a tall shaft with an inactive cooling fan unit towering up the center. Scan the base of the pillar for your Logbook, then simply scale the cooling fans to the top. Beyond here you'll locate Data Shrine 02, except the music here is far more ominous than before, so you know something's up.
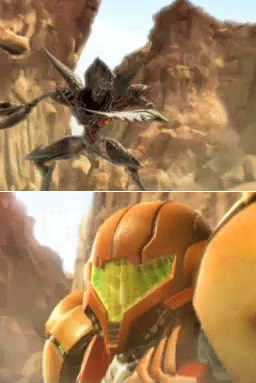
If you head left you'll only find a green blast shielded-door, so head right for now. Travel down the corridor and keep an eye out for a yellow-green target down the far end. Switch on your Scan Visor and scan the object before getting too close. This thing waiting for you is the first of six rival hunters you'll be facing - Kanden. Step forward and watch as the coward retreats down a narrow tunnel ahead. Follow it through and keep going while in Morph Ball mode as you exit the tunnel.
Down the far end of the corridor you emerge into you'll find another tunnel where a blue energy refill sits. Move through this tunnel to the far end to discover Missile CA.01 at the far end. Return the way you came and stand up, looking for the Alimbic Joist object for your Logbook on the way through. Exit Data Shrine 02 at the door ahead and move through to locate Fan Room Beta. This one's filled with Petrasyl, but before ascending the shaft go and scan the Tetra Galaxy entry at the observation window first.
Climb up the shaft, clearing Petrasyl as you go. At the top head through the door to locate Data Shrine 03. Bust open the crates on your right if you need supplies, then head left and enter the only door you find. Inside the main chamber you'll corner Kanden for your first hunter showdown.
Make sure you scan both his normal and alternate form (Stinglarva) for your Logbook before engaging. Without the correct weapon to utilise in this battle you'll need to resort to conventional weaponry to finish him off. Refer to the bosses guide for tips to send him away.
With Kanden dealt with, he'll magically teleport away to fight another day. But not without leaving you a special prize - another Shield Key. Pick it up to unlock a small hatch up on the bridge overhead. Climb up and open the door to reveal the Celestial Archives Attameter Artifact 01 inside a small chamber. Scan the artifact for your Logbook before securing it.
With that task complete the doors will unseal allowing granting your exit. Before leaving via the door with two blue pillars beside it, look for the Anthropological Hub and the Political Hub objects for your Logbook. Upon leaving the chamber you'll be attacked by an Alimbic Turret v1.0 off to your right. Quickly scan it before opening up, and keep moving to avoid anything it throws at you.
Take out the second near the sealed door ahead to unlock the door and open your next path. Through here you'll discover the Synergy Core. See that small teleporter pod on the ground ahead? Scan the yellow switch beside it to reactivate the portal.
Now you can easily use this to instantly travel back to your gunship to save your game and refill on health and ammo. Do that and return here via the teleporter. As you reappear, before climbing atop the platforms look straight up and scan the Lift Controls object along the wall (it's an easy one to miss). Climb up the shaft and don't worry about the yellow force field you find along the way.
At the top you'll discover a door at the end of a short hallway. Inside the following chamber you'll be sealed in, but something you need lies right in the center. A third artifact awaits you here, see those four small blue nodes on the walls? These switches are projectile-sensitive, simply shoot each one to reveal the Shield Key. Pick it up and scan the Celestial Archives Binary Subscripture 01 artifact before securing it.
With three artifacts now secured you'll be given a message informing you that another portal has now been activated, granting access to an otherwise inaccessible area. Sounds mysterious. So let's go find it. The doors will now unseal so exit via the door ahead. Down the end of the following hallway lies the Stronghold Portal (that was easy). You'll see all three of the artifacts attached to the portal's platform, step forward to see it activate.
Take note that you can scan the portal but it won't record to your Logbook, to actually record the Stronghold Portal object you'll need to scan it before all three artifacts are secure, but you'll get plenty of chances to later on. Step inside the portal to find yourself reappearing in a completely different (and alien) area.
Switch on your Scan Visor and scan the Stronghold Void Alimbic Lore entry directly ahead to learn that three artifacts are needed to access this area (check) and that the Alimbic's most sacred relics lie here, guarded by some tough opposition.
Step forward and proceed through the long corridor while taking in the funky sights around you. Scan the huge door at the far end before opening it up and stepping inside. Walk towards the next door and open it up. You'll now witness a cutscene of Samus entering a dark chamber, upon which a tall pillar rises from the floor - this can't be good.
Once you regain control quickly look up and scan the top of the pillar - this is a Cretaphid v1, one of the Alimbic's toughest security guards. Refer to the bosses guide to beat this cybernetic monstrosity and secure the object it guards.
With the first Cretaphid history watch as a cutscene plays depicting its fiery end. Upon returning to the chamber you'll find that a giant blue crystal has promptly replaced the Cretaphid. Scan it to reveal it as an Octolith - collecting these Alimbic artifacts is your ultimate objective here in the Alimbic Cluster. Before claiming your first one, look for the Biodefense Chamber A Alimbic Lore entry beside the sealed door.
Grab the health refills scattered around the chamber before touching the Octolith. Watch as the object fuses itself into Samus' suit, securing it for the journey ahead. Your gunship will allude to the theory that the Octoliths may be related to the ultimate power mentioned in the telepathic message, so it looks like we're on the right track. Time to get out of here.
Exit the chamber and move onward to the long elaborate hallway ahead. As you enter the room you'll be in for a surprise as a voice repeats "Octolith taken" and your gunship warns you of the enacting of a security protocol. You'll now have 8 minutes to make it back to your gunship before the Octolith you secured magically returns to its original resting place. Now this wouldn't be a Metroid game without an escape sequence would it?
Run down to the teleporter ahead to return to the Celestial Archives and quickly exit the portal chamber. You'll be instantly locked in the next chamber as swarms of Psycho Bits appear, with haste take them all out and exit the chamber quickly. Descend the shaft beyond to find that your handy ship deck teleporter at the base is inactive, so you'll have to leg it all the way back to your ship. Exit this area and head right once inside Data Shrine 03. Use the door you find to enter the central room of this area, then quickly exit here via the door on your right.
Take out the swarms of Psycho Bits outside quickly to unseal the door, then make your way through to Fan Room Beta. Drop to the base quickly and enter Data Shrine 02. Turn right and take apart the Psycho Bits in the tunnel ahead. Drop off the platform and activate the Morph Ball - quickly roll through the tunnel there going back the way you came. Watch out for the Lesser Ithrak deploying from the ceiling above as you exit, quickly take it out and move on.
Run forward and deal with the two Alimbic Turrets and a second Lesser Ithrak guarding the sealed door ahead. With all targets down quickly go inside to Fan Room Alpha and fall down to the bottom. Enter Data Shrine 01 and watch out for yet another Lesser Ithrak above.
Head left and keep going past the trio of Psycho Bits. Enter the door you find to be ambushed by a swarm of more Psycho Bits in the main chamber. Deal with them all, then go for the door without the two pillars beside it once they unseal.
Proceed left and deal with any rouge Psycho Bits along the way. Exit via the door ahead to find yourself back in the Meditation Room - nearly there. Climb up to the exit above and watch out for never-ending Petrasyl appearing here. Upon returning to the Helm Room you'll be ambushed a weird armless two-legged creatures pumping energy blasts at you. Scan one to reveal them as Guardians - another nasty security drone loyal to the Alimbic Order.
This thing will test your skill as it moves around frighteningly fast. Open up with everything you've got and use missiles if it comes too close. These things are very intelligent and can traverse around the environment with ease, on top of that they tend to travel in packs. Sure enough, there's two more waiting for you here. Deal with them all as quickly as possible then exit the chamber. Move through the winding corridor to finally find yourself back at the Celestial Gateway.
Don't waste any time, hop aboard your ship and enter it to secure your latest acquisition. Save your game when it prompts you, you'll then notice you can't exit your ship, so take off instead. Upon returning to the cold of space your gunship will pick up another location to visit - Alinos. Land on the red-hot world to continue your search for Octoliths.
Chapters:
- The Alimbic mystery
- Legacy of a millennia
- Weapons factory
- One eternal ice age
- Return to the archives