Data
Guides and strategies
- Power-up locations
- Shinespark Guide
- Bosses Guide
- Obstacles Guide
- Walkthrough
- Game endings
- Secrets and tips
- Game maps
Media
Bosses Guide

Monsters lurk within the narrow confines of Zebes' labyrinths at every turn. You'll be facing off against a range of the Space Pirate's strongest warriors, each guards a vital item for your arsenal or simply blocks a path they don't want you to tred through.
Old favourites such as Kraid, Ridley and Mother Brain return but they aren't alone in this new adventure.
As this game has sequence breaking kept in mind, some smaller bosses can be bypassed easily but I'll still cover all the nasties you'll find on your first run through the game. Beware of major boss strategy spoilers here, so read on only as a last resort.
Deorem (Giant Centipede)
- Location:
Brinstar - Attacks:
Head lunge, Spike projectiles - Weakness:
Missiles to the exposed eye
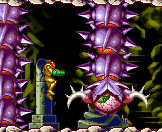
You'll encounter this bug after finding Missile Tank BR.01. The creature will use its long body to block off both sides of the screen so there's no escape. The creature's head will often lunge down in an attempt to slam Samus against the floor, so you'll need to recognise its attack patterns at once. Every time the two pincers on the head lash about it'll lunge down so keep an eye out for your cue to move. At first the head will travel straight down, but afterwards it'll come down to where Samus is standing, using the Morph Ball to get out of the way quickly often helps.
Don't get too close to the walls as small spikes hurl out of them, but shooting them will often reward you with health and missile refills. Once the head lunges down, the eye will open for a few seconds as it retracts back into the ceiling. Quickly get under it and fire a Missile up into the eye before it closes to injure the creature. You'll need to pop it in the eye a few more times to finish it off, but this creature will run away if the head disappears up into the ceiling.
If the creature hightails it out of there before you can deal the final blow fear not, as you'll find it later on in another corridor on your way to finding the Bomb upgrade. At each encounter Deorem will use the same attacks, and if it continues to escape it'll alternate between the two corridors. Once you manage to fry the coward you'll be rewarded with a floating Charge Beam upgrade (really, it floats in the air).
Mua (Acid Worm)
- Location:
Kraid - Attacks:
Acid bath, Clamp lunge, Spores - Weakness:
Missiles to the red core
This crazy worm accosts you right after you power up the Zip Lines in Kraid's area. You'll need to stay up out of the acid for the entire battle, as not only does the acid cause mortal damage to Samus' Power Suit (unless you manage to sequence break and pick up the Varia Suit early), you won't be able to move around as fast as normal while underwater - not a good thing when a 20 foot giant worm is out for your blood. The creature will stay in the center of the room and lash out when given the chance.
Always stay on the blocks to the left and right of the worm, and make sure the Zip Line's clamp is on your side (shoot the red switch if it isn't). Every time the pincers in the creature's maw moves, like lightning grab hold of the Zip Line to be carried across to the other side. If you time it just right the monster's clamp-like mouth will slam into the block instead of Samus, trapping it there for a few critical seconds. From the other side of the room begin tearing into the exposed flashing red core with Missiles before the worm breaks free.
Each hit will slowly damage the creature, so you've found its weak point. Wait for the mouth to move again before jumping onto the clamp, then fire Missiles into the core again. After a few rounds the worm may cause the acid level to slowly rise in the room, quickly jump up to high ground before it catches you. Also watch out for the spores it launches at you if you stay near one of the two doors of the room, but keep in mind that they drop energy and Missile refills if shot. Keep moving quickly each time the worm lunges out of the acid and you shouldn't have much trouble finishing it off. And keep out of the acid, it doesn't like it when you invade its home.
Kraid
- Location:
Kraid - Attacks:
Various spike/thorn projectiles, Claw swipe - Weakness:
Missiles to the open mouth
Kraid's not as tiny as he used to be, rather he's been on the most unsuccessful diet ever over the past years to make him so darn big. You'll be reminded of Super Metroid as Kraid will use similar attack patterns, but you'll be fighting him from the right side of the screen this time so things will quickly change. As before he'll be launching a range of thorn projectiles from his claws and belly so move around constantly in the small space allocated to avoid his projectiles.
You'll need to feed him Missiles whenever he opens his maw, usually he'll open up when a Missile hits him squarely in the face. Begin by using the platform by the door to jump up and hit him in the mouth, but after several shots his body will darken and thorns shot out of his belly will blow away part of the platform, leaving only one ledge left floating in mid-air. Try to stay atop the ledge while the thorns keep flying at you (shoot them for energy/ammo) and watch out for Kraid's other claw as he'll take swipes at you often. After more of a beating, the last floating ledge will crumble, leaving you with not much else to use.
When the large thorns shoot out of Kraid's belly they'll attach to the right wall, you can use these to climb up to shoot the mouth - but once they begin to flash they'll explode before another round fires out from Kraid. The tiny block above the door can be used as a safe breather spot, especially on Hard. By now Kraid should be a violent shade of red, so simply keep on feeding him his favourite delicacy before watching the monstrosity's grand exit as he falls down through the floor before erupting with one last roar.
Kiru Giru (Larvae/Caterpillar)
- Location:
Norfair - Attacks:
Heavy charge - Weakness:
Wave Beam to the underside (1st) Bombs to the underside (2nd)
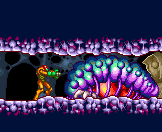
These two weird creatures block your path in Norfair, plus the door you entered their lair via has sealed so there's only one way forward. The first creature is too easy, all you need to do is fire the Wave Beam into its underside through the floor, enough of a beating will destroy the monster. Proceed right to face the second creature and find it in a pretty bad mood.
When you move too close the creature charges forward, so you'll need to run back left before it hits Samus. Firing your Beam or Missiles at its face (if you could call it a face) only causes it to reel back slowly, but you'll see why soon. The only weak spot is its red underbelly, and the only weapon that can reach it are Bombs. Keep firing at the monster to push it back far enough, then quickly activate the Morph Ball and roll over in front of it.
Lay a round of bombs just as the creature reels back to charge forward and the explosions will score direct hits on its underside as it lunges at you. Do this one or two more times to finish the creature off and secure your escape from the chamber.
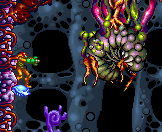
Ensnared Kiru Giru (Bug Larvae)
- Location:
Norfair - Attacks:
Spore projectiles - Weakness:
Missiles/Super Missiles to the veins connecting the creature to the ceiling
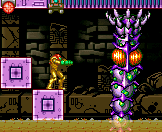
This monster will hang from the ceiling the entire battle and has only one form of defense - a random spread of tiny spores it ejects out into the room. Shooting the spores rewards you with energy/ammo refills, and the Ripper floating about is for more than looks. The only weak point of the creature is the huge pulsating veins connecting it to the ceiling, but you'll have a hard time hitting them without using the Ripper as a frozen stepping stone.
Wait for the Ripper to float over either left or right of Kiru then freeze it. Jump on and use the extra height to reach the throbbing veins. Pummel them with Missiles or Super Missiles, just watch out for incoming spores. Also remember to shoot the Ripper again before it unfreezes, you don't want to find your platform assistant flying away. Kiru Giru has one vein in the center blocking your shots from reaching the other side once you've cleared out enough veins, so you'll need to jump down and wait for the Ripper to float over to the other side. Freeze it again and jump aboard to reach the other veins.
Clear out the remaining veins and watch as the lumpy creature crashes down into the floor. The monster doesn't explode so you know you'll face it again later, pity you can't harm it as it writhes in the floor.
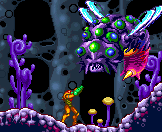
Imago (Overgrown Wasp)
- Location:
Ridley - Attacks:
Ultra charge, Stinger projectiles - Weakness:
Missiles/Super Missiles to the stinger protruding from its underside
This crazy wasp was the result of Kiru Giru's evolution from its larval stage. Keep in mind that this boss is optional - all it protects is a Super Missile and if you're playing for a speed run without a 100% item collection rate it's a waste of time fighting it. The monster will zip back and forth across the vast chamber as it tries to run you down. The best way to avoid taking a beating is to activate the Morph Ball and roll to either corner of the corridor where the wasp should miss you as it flies up out of the screen on each pass.
Follow the monster as it makes each pass, and stay in the corners before it charges down. When it reappears from the top of the screen, follow it from behind while attempting to berate the stinger with Missiles, or Super Missiles if you have any. As it moves right and disappears above the sealed door, at the end of the hall wait for it down at the base of the slope otherwise it'll make mad dives down at you from above. The same goes for the left end, wait for it a little to the right of the enclosure. You might have trouble catching up to it as it flies from right-to-left, just follow it and resume shooting as it goes from left-to-right.
Try and stay behind it at all times otherwise it'll deploy small stinger projectiles as it chases Samus, so keep up with it at each end of the corridor. With enough of a pounding the wasp will slowly change colour, first to a sickly green then a solid red. Keep blasting away at the stinger and it'll fall off, leaving the wasp with a massive smoking injury on its underside. The wasp will then take off beyond the right end of the corridor, quickly run over to the enclosure on the left end. Once there you'll witness the wasp kamikaze into the enclosure, finally blowing itself apart and courteously opening your way to the Super Missile Tank.
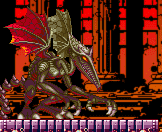
Ridley
- Location:
Ridley - Attacks:
Tail lash, Fireballs, Swooping claw grab - Weakness:
Missiles/Super Missiles to the head
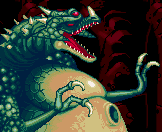
Once again you'll find yourself battling this nemesis deep in a fiery environment. As in previous titles Ridley will constantly fly around the screen attempting to beat Samus to a bloody pulp, but we're not going to let him, are we? Watch out for Ridley's opening attack - a flood of fireballs. Jump up between each one and try to stay airborne as long as you can before the barrage ends. He'll often lash his tail about, slamming it down into the ground while he slowly moves forward, so try to stay at the edge of the screen to wait out his attack run.
Also try to keep your footing on the main platform and stay away from the left and right edges where sections have broken off, uncovering the lava pit below. Ridley will also often spew out a range of fireballs, stay behind him or get ready for some fancy footwork as they rain down. Watch out for the dragon's constant swooping attacks, rolling under him with the Morph Ball often helps. Ridley's nastiest attack would be when he charges at Samus and grabs hold of her, not something you want happening in Hard mode.
If you're unlucky and are caught, aim up into the dragon's face and pummel it with Missiles and Super Missiles to trade damage with the fiend. As always his screaming head is the weak point, you'll want to fill it with Missiles - a lot of Missiles - to damage it. Start by unloading your payload of Super Missiles then continue with regular Missiles. On Hard mode survival is a very tough art indeed, but with quick footwork and an accurate trigger finger you should come out of the battle alive. But next time Nintendo should give Ridley different attack abilities, avoiding the same old tricks gives veteran Metroid players a huge advantage.
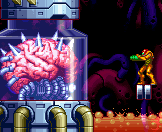
Mother Brain
- Location:
Tourian - Attacks:
Eye laser, Gun turrets, Circle projectiles - Weakness:
Missiles/Super Missiles to the open eye
You'll face Mother Brain in a corridor very similar to the original Metroid and Super Metroid's encounters. While Mother Brain sits idly in the glass chamber the only defense it has are the gun turrets firing small laser beams everywhere and the circular projectiles, but the frantic and chaotic nature of those weapons makes it difficult to avoid them. Try your absolute best to avoid falling into the lava pool as it's a complete pain trying to get out of it with projectiles raining down.
You've only got two blocks to stand on so it will get tricky. Like in Metroid and Super Metroid you'll need to crack open the glass chamber around Mother Brain to inflict mortal damage to the brain itself. Use Missiles firstly to break apart the glass, you'll want to keep your Super Missiles to damage the brain. Avoid the projectiles as best you can and keep firing at the glass. Eventually huge cracks slowly creep over the glass before it shatters completely, exposing Mother Brain. Don't be too cocky now as Mother Brain stills has a trick up its sleeve (even though it's just a brain).
Upon exposing the brain a huge single eye will open up and stare blankly at you. This is Mother Brain's ultimate weak point as you can't damage the brain, only the open eye. Quickly switch to Super Missiles and fire a single shot into the eye (you'll need to crouch while standing on one of the blocks to line up with it). As soon as you clear off a successful hit, jump up on top of the gun turret on the right wall, as Mother Brain will flash blue before unleashing a huge plasma blast straight across the screen; you don't want to be in its path. Every time Mother Brain unleashes a blast the eye will remain open for a few seconds more, use this time to fire another Super Missile into it.
Always remember to jump up atop the gun turret to avoid the eye's blast, and don't worry about the circle projectiles as the Screw Attack will protect you (plus they drop energy/ammo refills, very handy). Keep this pattern up and you'll crush this menace in no time. But watch out in Hard mode as Mother Brain's attacks pack far more damage, and staying out of the lava is an absolute necessity.
Following the tactics mentioned above should suffice on Hard, but avoiding Mother Brain's attacks and defenses is far more critical. Upon dealing the final blow Mother Brain will erupt along with the two gun turrets. The screen will then promptly tell you to evacuate immediately as a timer appears. This ain't over yet.
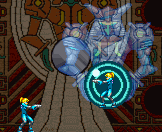
Chozo Warrior Engraving
- Location:
Chozodia (Chozo Ruins) - Attacks:
Random flight patterns, Lightning projectiles - Weakness:
Charged pistol shot to the glowing mirror
This massive engraving/painting in the northern-most expanse of the Chozo Ruins in Chozodia will come to life and battle you, a test no doubt designed by the Chozo to evaluate Samus' strength and determination. You'll easily spot the mirror-image of Samus appearing in the large circular mirror grasped in the Chozo Warrior's hands once the four small orbs surrounding it fire energy bolts into the center. Keep an eye on this mirror at all times.
At first the engraving will remain motionless, so wait for the mirror to glow before attacking. Once the mirror glows and emits a humming sound the mirror-image of Samus will disappear, to be replaced by an elaborate glowing symbol. Shoot the mirror once with a fully charged shot from the pistol now to damage it. Be very careful to ensure that you only ever fire at the mirror when Samus' reflection disappears, as if you hit the image of Samus you'll take damage yourself! After scoring a first direct hit, the mirror will deploy a smaller orb into the top-left empty socket in the wall.
The giant Chozo Warrior will then glow and produce an ethereal blue version of itself which will float about the room constantly trying to strike Samus. Once again you'll need to wait for the mirror, now within the floating apparition's hands, to glow before shooting it. Also watch out whenever the original painting of the warrior glows, as a lightning bolt will strike down right above you. Move about to avoid taking a hit. Shooting the glowing mirror a second time causes another small orb to emerge out of the mirror and set itself into the hole in the top-right corner.
Each time an orb fills a hole the lightning attacks will become stronger and harder to avoid so you'll need to be quick. Once the third orb sets itself into the bottom-left hole, the lightning attacks will strike down from above and charge out along the floor, so be ready to jump over the energy conduits. Also keep in mind that with each hit, the time the mirror glows is reduced, so by the time there's one hole left in the bottom-right the mirror only glows for about 2 seconds.
This gives you very little time to hit it, so be patient with your shots. Upon nailing the mirror a fourth and final time, the final orb will set itself into place in the bottom-right as the apparition returns to the original engraving. Now what? Have you passed the test? Watch the reflection of Samus in the mirror for the answer, something awesome's about to happen.
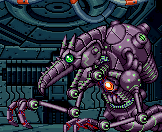
Mecha Ridley
- Location:
Chozodia (Space Pirate Mothership) - Attacks:
Claw swipe, Fireballs, Eye lasers, Homing missiles - Weakness:
Missiles/Super Missiles to the central core
This huge mechanical beast resembling Ridley will battle you in the large room at the highest point of the Space Pirate Mothership. Defeat this thing and you'll be all clear to finally escape from this place. But don't underestimate this foe, its powerful attacks (especially on Hard) really pack a punch. The machine's weak point is the red core right at the center of its chest - but right now it's protected by a glass cover.
Watch out first as Mecha Ridley may lash out with one of its arms, immediately begin Space Jumping up while staying up against the left wall to avoid it, you really don't want to fall for that attack. For the entire battle you'll be confined to the left side of the room, but the Space Jump ensures that you can dodge anything Ridley throws at you. Most of the time the head is lowered so you can't get a clear shot at the core.
You'll need to wait for Ridley to lash out before the head raises up, giving you a clear shot. Use Missiles to break open the glass cover, you don't want to use Super Missiles until it's exposed (unless you want this fight finished quickly). Oh, and as the core is a little higher than ground level you'll need to jump up to line up with it, try firing at it as you fall back down to strike it easier. Once the head lowers down again, get ready to Space Jump up and try to stay in the center of the wall's height, as Ridley will begin spewing out a barrage of huge fireballs.
Two rounds will come out, one going straight ahead and the other on a downward angle, leaving a gaping hole in the middle. So if you hover about level with the center of the wall you should completely avoid them. Ridley may randomly keep spewing out fireballs, just wait until he lashes out with his arm before firing at the core. Once you finally breach the core you'll have a clear shot to strike it directly. Switch to Super Missiles and use them very carefully, only fire when you know your aim will be true. Be warned though as Ridley may begin to fire green laser beams out of his eye randomly whenever it flashes.
He'll also repeatedly launch three large missiles out of his back which home in on Samus, Screw Attacking them is your best bet (and they drop energy/ammo refills too). Try to stay clear of the lasers as they will try to mess you up, and keep an eye on Ridley's arm. As soon as it lashes out again, quickly fill the core with Super Missiles, with luck and accuracy you should be able to score three hits before the head lowers down again. Each direct hit causes the entire machine to flash and spark, so you know you've got it now.
After filling it with more Super Missiles the machine will slowly change colour, first to a shade of blue, then purple and finally a deep red. Keep striking the core with Super Missiles and you'll finish it for good. Be very patient though on Hard mode, as you won't have that many Super Missiles to use, and Mecha Ridley's attacks - especially the claw swipe - cause mortal damage to Samus. It also appears that Mecha Ridley becomes significantly stronger with his attacks and defense if you've collected 100% of items in the game.
So if you're going for a maximum item rate run this battle will take longer and be a lot harder than if you have less than 100% of items. Either way, you'll know you've finished off the monster when it freezes before collapsing in a twisted metal heap. But there's no time for a sigh of relief, you've still got to get out of here, and Mecha Ridley has one more surprise in store.


