


Chapter 2: Escape!
Samus catches up with an old foe aboard the doomed Pirate vessel.
With the Parasite Queen defeated, its remains will drop down into the reactor core below and obliterate the entire thing. With the core gone, the ship begins spiraling out of control and in 7 minutes will crash into the planet below - time to make a break for it. You'll hear a voice repeatedly saying "Evacuate Immediately" so do as it says. Fly through the door ahead and tear through the next corridor.
Quickly activate the elevator in the next shaft and ride it back up to Deck Beta. Once at the top, disable the Turret around the corner by scanning the console ahead, then head through the door. You're now back in the large room with the hibernating Parasite Queen, but the reactor's explosion has woken it up and it's not in a good mood.
Several Pirates will be firing madly at it, wait a few seconds and the cryotube will explode, taking out the Queen and the surrounding Pirates. Quickly jump up the broken ramp behind the cryotube and blast the two Pirates on the balcony.
You won't be able to get back through the door you used when first entering this room, so head over to the other end of the balcony. Next to the blocked-up door is a heating coil, walk up to it and it'll explode, revealing a hidden tunnel.
Jump in and head through the ventilation shafts you'll find. Use the Morph Ball for extra speed, but watch out for the multiple Parasite swarms. At the end of the winding shafts you'll reach the Cargo Freight Lift to Deck Gamma shaft, keep going through to reach another ventilation shaft. You'll eventually reach a tall circular room with two Turrets, quickly fire missiles at them and continue on.
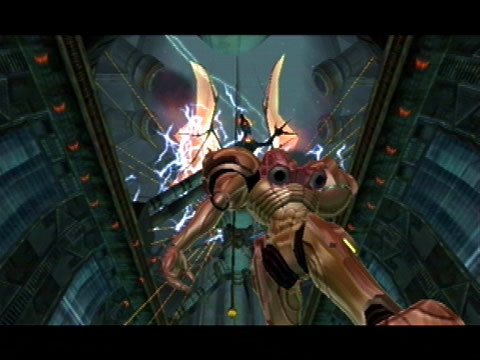
After proceeding through yet more shafts, you'll reach a room with a huge ramming pylon which fills the entire shaft. Wait for it to retract to the left, then quickly follow it and dash through an opening on the right when it appears. Go up the next shaft to find another large research lab. This one's different though, as the camera will pan up to reveal a menacing looking creature, which is none other than Samus' arch-enemy Ridley!
He'll fly up and out of the room, causing a load of metal pipes and debris to fall down. Now it's time to give the Grapple Beam a go. Look up at the Grapple Point above. Press L to swing onto the object, then release and press L again to swing onto the second point.
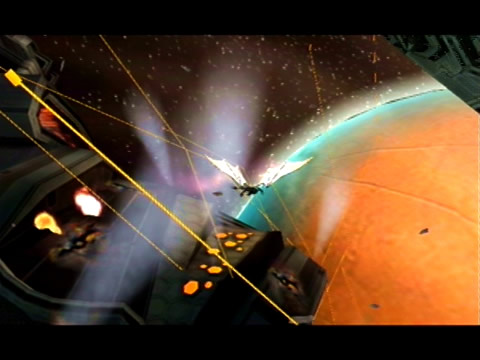
Ridley escapes the frigate, heading planetside.
Once on the other side, you can scan the consoles on the left and right to find information on Ridley, but once you're done head through the door there and deactivate the Turret in the next corridor. Walk over the bridge up to the elevator shaft and scan the switch to activate the elevator.
This is where Samus' luck goes bad, she'll turn around as a series of explosions behind on the bridge knock her rather violently into the elevator shaft's wall. As she stands back up the Varia Suit vanishes, returning Samus' Power Suit to its basic form while a voice begins to give you bad news, going through a list of all your items malfunctioning, leaving you with just the Power Beam.
At the top of the shaft, go through the winding tunnels to reach the airlock room. You can't go right due to a fire in front of the door so head left and the room will begin depressurizing. Quickly dash through the next corridor to finally make it back outside. A cutscene will then roll, showing Ridley escaping from the wreck of the frigate and heading down to the planet. Samus follows in her gunship, but loses track of Ridley. Now it's time to really get into the game.