


Chapter 20: The Sub Guardian Nightmare
Definitely save your game here.
Clear this room to locate the massive Main Gyro Chamber - turn right and look through the window ahead to see a massive purple ball of energy complete with two gigantic gyro rings rotating around it, coursing with electricity. Take in the sights before turning around and activating the lift near the door you entered via.
Take the lift down to see two small control terminals near the entrance of the huge Dynamo chamber (there's also a cobalt Luminoth Lore Projector which for now you can't scan). Walk over to the entrance of the Dynamo chamber but don't step inside, rather scan the two spinning gyro wheels to learn that somehow you can shut them down to access that sealed gate across from you (but first you'll need something to interface with the gate's lock system).
But enough of this for now, return topside to move onward. Across from the door you entered the Main Gyro Chamber via is a large green half-circle security door blocking access to the other half of this room. With no interface object nearby we'll need to find another way around.
Right beside the observation window you'll see a narrow tunnel leading off, so use the Morph Ball to sneak through. You'll reach an open area with a second tunnel leading to the northern section of the room (once you've discovered a way to shut the rotating gyros down you'll access them from here). Move on through the next tunnel to find yourself on the other side of the chamber. Here you'll spot a lone innocent Bomb Slot in the corner of the observation window.

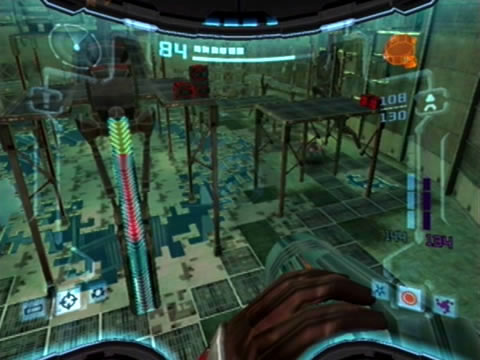
Use the Spinner here to create a handy shortcut through the Main Gyro Chamber.
Energize it to summon three coloured conduit lines appearing on the left side of the window, while nine coloured nodes appear in the center of the window. Stand up and scan one of the four smaller dots among them, your visor will reveal that the coloured nodes of this security system need to be aligned horizontally with their respective power conduits to complete the circuit.
So have a ball locking on and shooting the small dots to rotate the nodes in blocks of four (you'll get what I mean when you do it). Experiment to line up the coloured nodes correctly, when three same-coloured nodes line up with their matching conduit wire another conduit will appear on the right side of the window.
Line up all three to complete the circuit, disabling the security lockdown to cause a second Bomb Slot to rise from the floor on the right. Finally, energize this slot to power down the outer and larger of the two rotating gyro wheels, creating an effective platform to cross through the dynamo chamber.
Before moving across the gyro wheel, dismantle off the red blast shield on the door nearby and cruise through to the find a Save Station. Listen carefully now, you must absolutely, definitely, positively save your game right this very second to avoid a massive headache coming up. You'll see why soon. Very soon. Return to the Main Gyro Chamber and roll through the narrow tunnel to access the dynamo chamber.
Walk across the now-inactive outer dynamo ring and proceed to the opening on the other side of the chamber. Roll through the narrow tunnel on the opposite balcony to find yourself on the opposite side of the half-circle green security door. Fire up the Spinner at its base to open the door, giving you easier access to both sides of the room now.
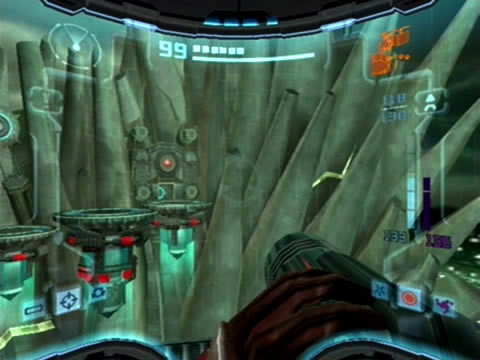
The Sanctuary temple needs a clean - there's scaffolding and objects everywhere.
That white door on the south-western side of the room leads to a very long (and very deep) chasm of which you can't cross yet, so we'll go elsewhere. Scan the control terminal beside the elevator in the corner of the Main Gyro Chamber and ride it topside. On the floor above you'll see a number of large canisters up against the observation window, scanning one reveals that they're blocking a Bomb Slot in the floor and are composed of Denzium, so no luck in removing them until you pick up your first Power Bomb (which is quite soon, by the way).
Proceed through the exit beside the elevator to reach the Temple Access chamber - nearly there now. Jump down off the balcony into the large open space of the room to find the door ahead seal itself. A single Quad drone will appear to test your might. Deal with the Quad CM part first before dealing with the legs of this roving mechanoid. Destroy the second Quad CM unit hovering in to bother you to unseal the door.
Before leaving - if you wish - activate the Dark Visor and look up at the wall above the door. There's four glowing red pods there - use the Seeker Launcher to strike them all at once. This will activate a handy Kinetic Orb Cannon to allow travellers to return to the entrance of the chamber, and will help in finding a Missile Tank later on (you'll need the Echo Visor to find it).
Move forward through the door to locate the gigantic open expanse of the Sanctuary Temple. Take the sights in around you; a number of large scaffolding platforms lie scattered around the room, you'll also notice a number of large robot components lying around, dismantled and motionless. Scan the large leg directly ahead with the Spider Ball track running up it. Remember what you've seen here, you'll be seeing a live version of this giant robot complete soon.
Drop off the cliff onto the floor of the room to witness two Ing Darkling warp into the room. They'll go straight for the two Quad drones meandering around, turning them into dark versions of their former selves. Scan both the head and leg components of one for your Logbook before engaging. Deal with them as you would a normal Quad drone by taking out the head first (use the Light Beam). With the area secure, break open the Luminoth crates scattered around for ammo and health.
Climb atop the scaffolding to find yourself able to reach all the exits high above via Grapple Points. The gray door on the western exit you can't open, and without updated translator files that translator gate on the eastern side isn't moving, so let's head for the Sanctuary Energy Controller through the door on the south side.

The Luminoth guardian here grants Samus access to cobalt holograms.
Once inside the Energy Controller, take in the grand view and scan the cobalt hologram to greet the Luminoth Sentinel. This friendly fellow will grant you access to cobalt translator gates and holoprojectors, so be sure to scan the Luminoth Lore Projector over on the wall nearby before leaving. Return to the Sanctuary Temple when you're done.
Welcome to that infamous part of the game where you're about to face off against a very nasty Sub Guardian... and the last Save Station was some time ago back in the Main Gyro Chamber. So if you lose, you'll have to play through the Sanctuary Temple sequence again before fighting the monster. So not the best experience to be had in this game. But with this guide you should be right, right? So let's do it.
Once overlooking the temple, see those small creatures dangling from the underside of the scaffolding below? Get closer and scan one to reveal these machines as Mekenobites. These noisy dangling fiends lob electric charges at you, so keep your distance. Only way to take them down is by using the Seeker Launcher and locking on to both of the creature's legs. With both legs struck at once the creature will fall to the ground and explode.
But we're heading through the door behind the cobalt translator gate, so no need to engage the Mekenobites. Scan the cobalt gate and proceed through once it lowers. Beyond here is the Workers Path - a massive cliff side region with only a number of floating platforms over the chasm. Now let's find a way to cross. Jump across to the nearest platform, then again to the smaller one ahead. Spin around to spot a small control terminal attached to the neighbouring platform you jumped from.
Beyond that tiny door in the distance lies one of the the game's toughest challenges.
Scan it to activate a Kinetic Orb Cannon atop the platform. That'll do nicely. Jump in to launch yourself way over to the other side of the area. Stand up, turn around and scan a similar control terminal on the platform before you to fire up a second Orb Cannon handy for use on the return trip.
Jump across to the door nearby and head on through. Inside is not a pretty sight. You'll find yourself in a separate section of the Dynamo Works area you explored earlier. Directly before you lies a narrow tunnel where a small being rolls about around the entrance. Scan this little eyesore now for your Logbook to reveal it as the Spider Guardian - quite possibly your worst nightmare. This Darkling-possessed Pillbug can only be harmed one way, but you'll be fighting it in Morph Ball mode, making this one tricky battle. Roll through he tunnel to engage the beast, and refer to the bosses guide for tips to survive this battle the first time.
Upon destroying the smallest yet toughest Sub Guardian of the game, the Darkling possessing the Pillbug will emerge into a small chamber beside a yellow door before erupting, leaving the Spider Ball power-up behind. Climb up the tunnel network and claim your very well-deserved prize. With the Spider Ball finally recovered, there's plenty of places you can explore now. But see the yellow door blocking your path here? That means we can now finally go and pick up your first Power Bomb. But it's buried in the depths of the Dark Torvus Bog, so time to return to the Temple Grounds.
Chapters:
- Planetfall
- The World Divided
- Fate of the Federation Troopers
- The Plight of the Luminoth
- The Sands of Agon
- Dark Aether
- The Space Pirate's Lair
- Samus vs Dark Samus
- Unlocking the Dark Agon Temple
- Restoring the Energy Controller
- The Journey to Torvus
- The Everlasting Deluge
- Restoring the Flooded Temple
- Taking the Fight to the Ing
- Expanding Samus' Arsenal
- The Underwater Temple
- Securing the Dark Torvus Temple
- The Path to Sanctuary
- The Mechanical Marvels of Aether
- The Sub Guardian Nightmare
- Subterranean Conquest
- Searching the Fortress
- Retrieving the Charge Combos
- Following the Echoes
- The Screw Attack Returns
- The King of all Mechanoids
- Gearing up for the Finale
- Unlocking the Sky Temple
- The Final Treasure Hunt
- Ending the War