


Chapter 13: Restoring the Flooded Temple

Down this pipe lies a handy Energy Tank.
The entire area is covered with glowing red vines, the lake below is replaced with a sickly purple toxic bath, and thankfully the Bomb Slot is visible beyond the bridge. Walk forward and activate the Light Beacon atop the pillar connecting the two bridge sections. Scan the blue eye on the wall ahead to reveal it as a Dark Sentinel Crystal - exactly the same as its light world counterpart only designed to work in this toxic environment.
Spin around and look at the northern side of the area. You'll see a number of Ingsphere Cache there, scan one for your Logbook. Move over to the Bomb Slot and energize it with a bomb, doing so will rotate the bridge here and the one on Aether. As you walk back to the Light Beacon atop the central pillar between bridges you may hear an audible grumble. Look down into the murky waters below to see a large circular creature bobbing about on the spot. Scan it to reveal it as a Dark Phlogus.
This cousin of a similar creature back in the Magmoor Caverns works exactly the same way - shoot the central region when it opens up to stun the creature, causing it to flip over and creating a temporary platform to stand on. For now the only doors accessible to you from here and yellow and green, so we'll head back to the light world for now. Climb up to the inactive portal and charge it up before jumping in.
Once back in the (relative) safety of Torvus Bog, two dimensional rifts will open across from you before two Space Pirate-looking creatures emerge and promptly vanish. Immediately take out the Light Beam and watch for them reappearing. Scan one to reveal them as Dark Pirate Commandos - the strongest form of a possessed Space Pirate you'll see. These creatures will jump around the area constantly appearing and disappearing, so watch you radar and try to stay far back.
Watch out for grenades they enjoy sending your way as they'll mess with your visor giving you a face-full of static. Also keep an eye out for standard dark energy projectiles. Jump down and engage them, don't worry as they strangely don't attack until they're visible. Eventually destroying one will send a hint to its buddy, which will promptly retreat.

Space Pirates have this area patrolled too.
Climb back up to the now-rotated bridge and cross it, picking up Missile TB.01 waiting for you in front of a door at the end. Inside the next narrow twisting area you'll spot another Missile Expansion directly ahead behind a number of twisting roots, but for now you can't reach it. Turn the corner and drop below into the small pond. Look up on the left wall and scan the creature attached there. This Sporb will only attack if you travel too close, and unfortunately it's positioned directly across from a number of small tunnels in the wall opposite you need to travel through.
Climb back atop the short cliff and activate the Morph Ball. Roll through the narrow tunnel and wait for the Sporb to launch itself at you. Avoid it and fall back down into the pond below. Stand up and quickly destroy the creature before it launches needles at you. With your path clear, go back up and roll through the tunnels to reach the opposite cliff. Roll through the narrow red tunnel to find yourself on a cliff overlooking another pond. Directly ahead lies that missile you spotted earlier, but without the Grapple Beam you can't reach it. Drop below and move forward, head through the door you find.
Once outside you'll discover that you've come full circle, and are now back at the Great Bridge atop the ledge where the control terminal lies. Scan it to activate a Kinetic Orb Cannon (bet you didn't notice it there before) lying in front of the translator gate on the other side of the area. Use it to launch yourself up to the bridge (ignore the Shriekers). Take out the Shriekbats nesting above the door across the bridge, then head on through.
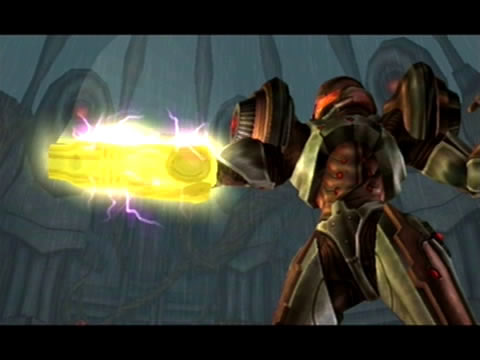
Samus receives the powerful Super Missile.
Inside is a very narrow tunnel, along the way you'll discover a small round plate covering a tunnel leading below. Destroy it with a bomb, then fall through pick up Energy Tank TB.01. Return to the Great Bridge and use the Kinetic Orb Cannon again to reach the bridge. Move through the Temple Access and head through the black door at the far end of the corridor. Greeting you beyond here is the massive open-air Torvus Temple.
But before long a Pirate Skiff swoops in to give you trouble. Take out the first trooper and watch as the skiff makes a hasty exit. Two Aerotroopers will then appear from above, deal with them quickly. The skiff will then make one final run, dropping off four more troopers. Deal with them all, grabbing health and ammo from the crates scattered around if need be.
Upon securing the area, force fields covering an elevator platform on the far side of the temple will disappear, revealing an item waiting for you there. Walk over and scan it to reveal it as the Super Missile! Pick it up for your first Charge Beam Combo, with this you can now open up green doors. With your new toy locked away a hologram will appear on the elevator platform. Jump on to ride it up to the top of the temple, here you'll discover a green blast shield blocking your path.
Use your new weapon to blow it off and head inside. Beyond you'll discover the Temple Security Station. Energize the Bomb Slot to rotate the room, granting you access to the Torvus Energy Controller. Once inside you'll know what to do. Scan the green hologram before the Energy Controller to greet the Luminoth Sentinel, A-Voq.
A-Voq will then grant you access to emerald hologram devices. Now just like in Agon, it's time to go hunting for the three Dark Temple Keys needed to unlock the Dark Torvus Temple. Before leaving, scan the remains of the Luminoth warrior nearby, and also the emerald Luminoth Lore Projector on the wall for your Logbook.
Chapters:
- Planetfall
- The World Divided
- Fate of the Federation Troopers
- The Plight of the Luminoth
- The Sands of Agon
- Dark Aether
- The Space Pirate's Lair
- Samus vs Dark Samus
- Unlocking the Dark Agon Temple
- Restoring the Energy Controller
- The Journey to Torvus
- The Everlasting Deluge
- Restoring the Flooded Temple
- Taking the Fight to the Ing
- Expanding Samus' Arsenal
- The Underwater Temple
- Securing the Dark Torvus Temple
- The Path to Sanctuary
- The Mechanical Marvels of Aether
- The Sub Guardian Nightmare
- Subterranean Conquest
- Searching the Fortress
- Retrieving the Charge Combos
- Following the Echoes
- The Screw Attack Returns
- The King of all Mechanoids
- Gearing up for the Finale
- Unlocking the Sky Temple
- The Final Treasure Hunt
- Ending the War