


Chapter 19: The Mechanical Marvels of Aether
Power down these pretty gyros to proceed.
Now we'll delve into the guts of the fortress. First thing we need to do is find the temple and the Sanctuary Energy Controller. Inside the Reactor Core, the only path you can take is up around the central reactor unit. Patrolling the reactor are two rogue Rezbits, engage them one at a time, and put something solid between you and the target when it deploys the virus attack to safely avoid a funky visor mess.
With both foes taken down you'll be clear to ascend the reactor. Don't worry about that Kinetic Orb Cannon over in the alcove, you'll use it once you've recovered the Spider Ball. Climb up the shaft by way of the platforms lining the walls (and take in the graphical beauty of this room as you go).
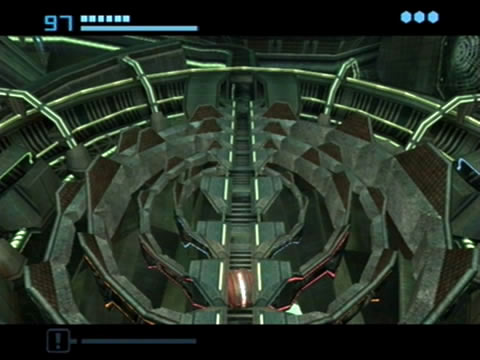
Once as high as you can go you'll find a circular landing where a third Rezbit patrols. Ignore it and head for the door on the eastern side of the landing. Beyond in the following chamber you'll be greeted by an unusual sight. Outside a window ahead you'll witness a large array of huge gyros spinning about on the spot. That platform they're attached to is your ticket through this area, so you'll need to look for a way to shut down the gyros' erratic rotations. Scan the rotating gyros to learn more of their function, and scan one of the floating droids hovering about to learn that these particular machines are harmless.
That narrow tunnel on the left of the window leads down to the gyros, but before moving on scan the terminal beside you to learn of a lockdown code required to shut down the gyros. The code is as follows: Amber, Cobalt, Crimson and Emerald. Remember that order well. Activate the Morph Ball and roll on through the tunnel. Below you'll find four coloured Bomb Slots surrounding the gyros, and you guessed it, all four colours correspond to those given in the lockdown code order. So energize the Bomb Slots in the correct order to power down all four gyros, clearing your path forward.
Roll through the now-inactive gyros and up the tunnel. Proceed onwards to discover the Hall of Combat Mastery. The "combat" word is key here, the first thing you'll see is one of those large ball-handed droids inactive up against the wall ahead. Turn the corner to spot a Quad drone down the other end of the hall doing the rounds. Cross the corridor and engage the Quad, taking out the Quad CM easily with a Super Missile (or two on Hard mode).

Step into this portal to find the Ing Hive.
Proceed onward with the target down and engage the second Quad drone you find. You may notice a few Spider Ball tracks running up the walls of this room leading into narrow tunnel networks, you'll explore those soon enough. On either end of the corridor section the second Quad patrols are two inactive Quad MB units. Make sure you take out the Quad CM (the head part) of the active drone as if you take out its legs first it'll simply hover over to one of the inactive units and power it up.
With your position secure move down to the south-eastern side of the corridors. Beyond a glass tube (which upon scanning is revealed to be Power Bomb-destructible) you'll locate a Dark Portal station. Just what we need to move on further (as that other exit in the Hall of Combat Mastery is inaccessible beyond a glass window). Scan the terminal beside the portal to charge it up and step on in, taking the only path forward.
Once on the other side you'll find yourself in the Ing Hive, this is apparently where the Ing hang out most, so expect a lot of nasty customers here. Exit the portal chamber and turn around, you'll see a door beside the chamber. Go inside but with haste as there's an item ahead but no safe zones to protect you. In the Hazing Cliff you'll find a large chamber with most of its floor missing and an endless cliff below.
Step to the edge of the cliff to receive a visitor - what looks like a punked-out Metroid will hover up from below. Scan the thing to reveal it as a Dark Tallon Metroid. So the Ing can actually possess and consume Metroids (unlike the X from SR388). Deal with it as you would a normal Metroid, using bombs to shake it off if it grabs hold. Use charged shots from the Light Beam and Super Missiles to deal with it in no time.

The bowels of Dark Aether disappear into a swirling purple haze.
With the twisted Metroid gone, carefully move around the cliff edge to find a purple energy ball hovering at the entrance of a tunnel. Scan it to reveal it as a Dark Diligence Drone. This thing will give you a face full of static if you move close, so deal with it from afar with a charged Light Beam shot. Take out the second one hiding behind the first to locate Missile SA.01 tucked away in a dead-end. Quickly return to the Culling Chamber and go further inside.
From inside the main corridors of the Culling Chamber you'll see a very obvious Dark Temple Key tucked away inside the wall section ahead of you. Surrounding it are a number of Spider Ball tracks (and a vein of Phazon), so no luck going in there till you have your next power-up. Energize the Light Beacon nearby with the Light Beam and stay within it, as moving forward will reveal a Warrior Ing.
Deal with the monster, then scan that weird writhing ball of Ingworms near the pillar for your Logbook. This Ingworm Cache contains either an energy or missile refill, destroy it with the Dark Beam if you're low on Light ammo. Move down the corridor to the next Light Beacon, to the right of it you'll spot a black door.
There's an exit out of the Culling Chamber on the western side, but all it leads to is the Hive Reactor where you'll only find Ammo and Save Stations - a yellow door will be blocking your path so there's not much to find there for now (but do a little exploring if you feel like it). For now we'll move through the black door. Inside you'll discover an elevator shaft. Take out the Ingworm Cache surrounding the lift for refills, then power up the elevator and ride it topside (thankfully the safe zone follows the lift platform as well).

Use your Dark Visor to reveal a way across.
Exit the lift and drop off the tall platform into the Dynamo Works chamber below (don't worry, we won't be stuck here for long). Energize the Light Beacon and step over to the window ahead. Beyond a larger chamber lies with a never-ending drop. See the Grapple Point up above? That's your ticket across, but first deal with all the pesky Nightbarbs swarming about to ensure a smooth trip.
With all targets accounted for we can now swing across safely (before you do, turn left and look through the crisscrossing metal wall into a neighbouring room and switch on the Dark Visor. See that red blob over in the corner ahead? You'll find out the importance of it soon). Once across the other side you'll find a large red shield blocking access to an inactive Light Portal beside the Light Crystal. Before you deal with it, if you head through the white door nearby you'll discover a big empty chamber save for a Warrior Ing. Deal with the creature and listen carefully. Hear that constant pulsing sound?
That sound is a sonic security system linked to that sealed door you can't open to proceed. So let's go back to the Hive Dynamo Works and access the Light Portal. Look back towards the Grapple Point over the chasm and switch on the Dark Visor. Up on the wall opposite you'll see five highlighted control pods. Shoot down the Nightbarb swarm if it respawned, then break out the Seeker Launcher and use it to destroy all five pods at once, lowering the shield guarding the portal.

Remember these beings from Tallon IV? Use the Dark Beam to clear them out.
Fire up the portal and return to Aether. Once back in the fortress you'll find that the chasm here is securely bridged, but two Quad MBs lie in wait. Walking near them will active two corresponding Quad CMs with active shields. Use the opposite beam depending on what colour the shield is to break through. Deal with both rogue drones and move to the eastern end of the chamber. You can't reach the door above the Spider Ball track, but you can still scan the body of the Luminoth warrior above on the ledge for your Logbook.
Proceed back down the other end of the chamber and head through the black door there. Inside the following tunnel you'll see a familiar object, a large purple energy ball moving back and forth with three electrical arms reaching out to the walls (Pulse Bombus on Tallon IV resemble these). Scan one for your Logbook, these Diligence Class Drones can be destroyed with Dark Beam blasts.
Further ahead you'll face an impassable wall seeing as you don't have the Spider Ball yet. Instead, we'll roll under the wall to get past. Look down to see an open section under the floor, scan one of the roving creatures for your Logbook - these Mechlops will try to forcibly remove you from their tunnels while in Morph Ball mode. Activate the Morph Ball and roll under the floor, dropping bombs for the Mechlops to pick up and promptly blow themselves up with.
Chapters:
- Planetfall
- The World Divided
- Fate of the Federation Troopers
- The Plight of the Luminoth
- The Sands of Agon
- Dark Aether
- The Space Pirate's Lair
- Samus vs Dark Samus
- Unlocking the Dark Agon Temple
- Restoring the Energy Controller
- The Journey to Torvus
- The Everlasting Deluge
- Restoring the Flooded Temple
- Taking the Fight to the Ing
- Expanding Samus' Arsenal
- The Underwater Temple
- Securing the Dark Torvus Temple
- The Path to Sanctuary
- The Mechanical Marvels of Aether
- The Sub Guardian Nightmare
- Subterranean Conquest
- Searching the Fortress
- Retrieving the Charge Combos
- Following the Echoes
- The Screw Attack Returns
- The King of all Mechanoids
- Gearing up for the Finale
- Unlocking the Sky Temple
- The Final Treasure Hunt
- Ending the War